Showing posts with label personal care. Show all posts

Wednesday, December 11, 2013

Homemade Christmas: Bay Rum Aftershave Balm


Homemade personal care products are so much fun to make and give, but usually it's the women on your gift list who benefit from your efforts. So I'm pretty excited that I've finally made something that the men in my life should appreciate!

Quite a few years back I had bought my hubby a Bay Rum gift set from Burt's Bees and I really loved the smell of it. Unfortunately, they stopped making this line a few years ago - but maybe that ended up being a good thing in the end, since it forced me to get creative and see what I could come up with on my own. Joe has taken to using my hard lotion bars on his skin after shaving, and I thought it would be nice to make him something that's a bit easier to apply with a special masculine scent to it.

While it's probably not even close to an exact match for the Burt's Bees products, I did manage to create a satisfyingly manly scent, nice and spicy and fresh smelling with a hint of orange. Best of all, there's nothing too exotic in this balm, so you should be able to find nearly everything you need to make it (except for the beeswax and essential oil) at the grocery store!

Here's what you'll need:
11 oz coconut oil
3 tbsp olive oil
4 bay leaves
1 cinnamon stick
2 whole cloves
zest of 1 orange
1 oz beeswax
10 drops sweet orange essential oil
1/2 tsp rum extract

In a small saucepan, melt the coconut oil and olive oil together over low heat (you can do this over a double boiler if you've got one). Add the bay leaves, cinnamon stick, cloves and orange zest. Leave the spices infusing in the oil over low heat for 1-2 hours (check periodically to make sure that the oil is not boiling).

Once the spices are done infusing, strain the oil through a fine mesh strainer lined with cheesecloth into a heatproof bowl or another small saucepan. Add the beeswax and heat over low heat (if using a saucepan) or set the bowl over a pot of boiling water (you can also pour into a Mason jar and set it on top of a washcloth in a pot of simmering water). Stir occasionally until beeswax is completely melted.

Once beeswax is melted, remove from heat and add essential oil and rum extract. Place bowl in fridge for about half an hour, then transfer to freezer for about 10 minutes. There should be some solid areas starting to form around the edges (if not, just give it a few more minutes). Beat the balm with an electric mixer for a minute or two so the solids are broken up and it has a uniform texture. Return to the freezer for another 5 minutes or so, then beat with mixer again (if the solids are really stuck to the sides, use a knife to scrape them off before beating). Return to the freezer for about 5 more minutes and beat one final time (at this point it should be light and fluffy and look like the balm in the photo).

Transfer the balm to clean jars (try not to touch it with your fingers as it will melt on body contact - I used a spatula/spoon combo to get the job done).

This recipe will make about 2 cups of balm, enough to fill 4 jars as shown in the photo.

Do you have a homemade gift you love to make for the menfolk?

If you missed the earlier installments of my Homemade Christmas series, check out Create Your Own Tea Blends, this super-luxurious Chocolate Orange Whipped Body Butter and a lovely Lavender & Calendula Face Scrub. For even more holiday ideas, you can find my whole Christmas on a Dime series HERE. 

Mountain Rose Herbs. A herbs, health and harmony c 
Love what you read here? Click HERE to see the ways you can help support this blog (many of them won't cost you a thing!) 

Want to stay connected in between blog posts?

Click HERE to sign up for my Cook with Karen newsletter (max 2 emails a month)

Click HERE to follow me on Pinterest 

Click HERE to follow me on Twitter

Click HERE to like Abundance on a Dime on Facebook and get updates and tips on living frugally

Click HERE to like Cheap Appétit on Facebook and get updates and tips on frugal eating and cooking

Wednesday, November 27, 2013

Homemade Christmas: Whipped Body Butters, Two Ways


It's official: body butter is my new favourite "anyone can do this" DIY personal care product. Especially the delicious Chocolate Orange version I just cooked up (must.not.eat.body.butter).

Today I'm going to share two different ways to make body butter. The first one is the more extravagant Chocolate Orange version and then I'll fill you in on my friend Kerry's easy Whipped Coconut Oil Body Butter.

Chocolate Orange Body Butter
I made a batch of this earlier today so I could photograph it for this post and I'm having trouble not sneaking back into the kitchen to continuously slather myself with this (or at least give it a good sniff and admire its fluffy rich texture).  While the chocolate orange scent smells delicious, the sweet orange essential oil is also known to have a number of health benefits, including boosting your mood (and who couldn't use a bit of that in the middle of winter?). Below is the recipe I used and then I'll tell you how you can adapt it to suit your own tastes. Using an unrefined cocoa butter will give the final product a more intense chocolatey scent.

Ingredients:
4 oz jojoba oil
4 oz cocoa butter (unrefined if you can get it)
4 oz mango butter
4 oz coconut oil
20-25 drops sweet orange essential oil

In a medium, heavy-bottomed saucepan, combine all of the ingredients and cook over low heat until totally melted (give it a good stir at the end to make sure the oils are thoroughly blended).

Place the pot in the fridge on a trivet or cork mat to cool for about half an hour. Add the essential oil, then transfer to the freezer and let cool for another 15-20 minutes or until it is starting to solidify on top but NOT all the way through.

Remove from the freezer and beat on medium-high speed with an electric mixer until it changes to a light, fluffy consistency. Return to freezer for about 5 minutes or until it is fairly firm but not rock-solid (i.e. it will still yield slightly if you give it a poke). Beat the butter again to a smooth consistency then transfer to storage containers (try not to touch it while transferring it, or it will melt under the heat of your fingers - I used a combination of spoon and spatula to get it all packed into jars).

This recipe will make 3 to 3 1/2 cups of body butter. When I costed it out with the ingredients I used, it came to around $27.50 for the batch. That's fairly pricey in my world, but it will yield you 6 half-cup jars to give as gifts with a little bit extra to keep for yourself. That's about $4.60 per gift, which is really reasonable even for a frugalista like me. If you want a more extravagant gift, you could add some homemade scented bath salts or a sugar scrub, hard lotion bars or lip balm, face scrub or a personalized tea blend, all of which are very inexpensive to make!

You could lower the cost of this recipe by using another oil in place of the jojoba, like grapeseed or olive. You could also use any combination of solid fats you like, as long as the ratio of solid to liquid fats is 3:1. If you don't want a chocolate scented body butter, you could use shea butter in place of the cocoa butter or use twice as much each of the mango butter and coconut oil (6 oz of each rather than 4).

If this (admittedly fabulous, but somewhat pricey) body butter isn't in your budget, here's another quick and easy option that only uses two easy-to-find ingredients.
 
Kerry's Easy Whipped Coconut Oil Body Butter
My friend Kerry Turcotte shared this recipe with me. She is a whiz at DIY personal care products, and runs workshops on how to make everything from sugar scrubs to cold process soaps - check out her events HERE if you're in the Hamilton area!

Ingredients:
7 oz coconut oil
3/4 oz beeswax
essential oils, if desired (about 10-15 drops)

Melt the beeswax and the coconut oil together in a small saucepan (or in a glass dish in the microwave).

Place in the fridge for half an hour to cool, then transfer to freezer until it starts to firm up but is not rock solid. Beat with an electric mixer until it has a light and fluffy consistency. Transfer to storage jars.

This recipe should only cost you about $3.00 or so, depending on the coconut oil you use (even less if you use cosmetic grade rather than food grade coconut oil). It doesn't make quite as much body butter, either (I'd say less than 2 cups), so you might want to double it if you want to have enough to give to several people.

Where to get the ingredients to make body butters:
I bought my mango and cocoa butters from Mountain Rose Herbs, but as I mentioned before, their shipping rates to Canada are pretty steep. So, if you're in the U.S., I'd definely recommend Mountain Rose, but if you're in Canada,  a better option may be Saffire Blue, especially if you're in Ontario. They have a FANTASTIC deal on cosmetic grade coconut oil and you'll find all the other butters and oils you need to make these recipes as well.

You can usually buy beeswax from a local honey producer (or, failing that, the health food store). Mountain Rose sells it as well, although you should be able to find some locally for the same (or even lower) price.

I buy most of my essential oils from Well.ca - I find the Aura Cacia brand reasonably priced and good quality)

 If you missed the earlier installments of my Homemade Christmas series, check out Create Your Own Tea Blends and a lovely Lavender & Calendula Face Scrub. For even more holiday ideas, you can find my whole Christmas on a Dime series HERE. 

Note: The links to Mountain Rose are affiliate links and I will receive a commission from them (at no cost to you) for any purchases you make after clicking these links.

Mountain Rose Herbs. A herbs, health and harmony c 
Love what you read here? Click HERE to see the ways you can help support this blog (many of them won't cost you a thing!) 

Want to stay connected in between blog posts?

Click HERE to sign up for my Cook with Karen newsletter (max 2 emails a month)

Click HERE to follow me on Pinterest 

Click HERE to follow me on Twitter

Click HERE to like Abundance on a Dime on Facebook and get updates and tips on living frugally

Click HERE to like Cheap Appétit on Facebook and get updates and tips on frugal eating and cooking

Wednesday, November 20, 2013

Homemade Christmas: Lavender & Calendula Face Scrub

 
I'm back with another DIY Christmas gift suggestion this week. This lavender and calendula scrub rocks on many levels: you can whip up a batch in minutes, it's perfect for all the ladies on your gift list, it's extremely inexpensive to make, and oh-my-goodness, what it does for your skin. Especially in the middle of a Canadian winter :)

I have been using one variation or another of this scrub on my face for a couple of years now instead of any type of commercial cleanser or soap product, and I've never looked back. It's very similar to those pricey "cleansing grains" you see in upscale cosmetics boutiques. Apparently my skin still has a dewy, youthful glow as a stranger told me a couple of weeks ago that she thought I was about 26 - you should have seen her jaw drop when I told her I had a 16 year old son!

But I digress...

Seriously, I don't think you'll be disappointed if you make this face scrub. It lends itself well to lots of variations (for example, you could use rose petals and rose essential oil instead of lavender for another spin on the floral theme). I would definitely keep the calendula in the mix, as it's used more for its healing properties than as a contributor to scent or colour.

I specifically went with the lavender-calendula combo so I could pair it with this lavender-calendula lip balm!

I use a spice grinder to grind all the ingredients - don't use your coffee grinder or your scrub will smell like coffee and your coffee will taste like lavender :)

Ingredients:
1/3 cup white rice flour
1/4 cup finely ground oats
2 tbsp finely ground coconut
1 tbsp ground lavender flowers
2 tbsp ground calendula flowers
10-20 drops lavender essential oil

Instructions:
Combine the rice flour, oats, coconut, lavender and calendula flowers. Add the lavender essential oil and stir until evenly incorporated into the scrub.

That's it!!

To use: Put about a teaspoon of scrub in the palm of your hand and add enough water to make a thick paste. Gently rub on face in a circular motion, then rinse off (I find it easier to use it in the shower rather than trying to rinse off in front of the sink).

Where to find dried herbs for making scrubs:
If you have a local health food store with a bulk section, check there first! My local store carries both lavender and calendula flowers.

If you don't have a good local source of bulk herbs, I highly recommend Mountain Rose Herbs. They have great prices on high quality organic herbs (as well as culinary herbs and spices, tea blends and many other wonderful things!) Their shipping costs to Canada are fairly steep, but their prices are so good that the overall cost is still lower than anywhere else I've found for comparable quality products.

If you missed the first installment of my Homemade Christmas series, check out Create Your Own Tea Blends. For even more holiday ideas, you can find my whole Christmas on a Dime series HERE. 

Note: The links to Mountain Rose are affiliate links and I will receive a commission from them (at no cost to you) for any purchases you make after clicking these links.

Mountain Rose Herbs. A herbs, health and harmony c 
Love what you read here? Click HERE to see the ways you can help support this blog (many of them won't cost you a thing!) 

Want to stay connected in between blog posts?

Click HERE to sign up for my Cook with Karen newsletter (max 2 emails a month)

Click HERE to follow me on Pinterest 

Click HERE to follow me on Twitter

Click HERE to like Abundance on a Dime on Facebook and get updates and tips on living frugally

Click HERE to like Cheap Appétit on Facebook and get updates and tips on frugal eating and cooking

Tuesday, July 9, 2013

Small Yet Satisfying #2: Making Dandelion Salve

A whole lot of Dandelion Salve!

I set myself a little goal this weekend: I've decided to take a cyber-free day once a week all summer - most likely on Sundays. When I've taken completely unplugged days before I've found I can be really productive or really relaxed (whichever I had in mind for the day) as I don't have the constant mental pull towards checking my email/Facebook/the internet in general.

While my main purpose in doing this is to feel like I'm getting more downtime to read, ride my bike, chill out on my front porch and spend time with my family, I also thought it would be a good time to focus on getting a few more "Small Yet Satisfying" projects completed as it's amazing how much more time I seem to have in a day when the computer stays off!

My project for this past Sunday was to make myself some Dandelion Salve. I've been meaning to get around to this for ages! I saw this recipe on the Nerdy Farmwife blog when she posted it back in April and was immediately intrigued. I'm always a fan of a recipe that uses a main ingredient I can get for free! I picked a ton of dandelions when they were at their peak earlier this season, and dried them out thoroughly. I even got them infusing in some olive oil and heat-infused them for a couple of hours. They've been sitting in a jar on my kitchen windowsill ever since and it was more than high time for me to get around to actually making the salve.

I've made salves a couple of times before, and found that a ratio of 1 cup olive oil to 1-2 ounces of grated beeswax will make a salve with the consistency I like (in general, it's better to use a bit more beeswax during the summer or if you live in a hot climate, so that the salve doesn't get too soft in the warmer temps).

So, this is roughly how I made the salve:

Infusing stage:
  • Fill a pint jar about 2/3 of the way full of dried dandelion flowers
  • Pour olive oil over top until it covered the dandelions with a tiny bit to spare on top
  • Heat the jar in a saucepan of simmering water for a couple of hours
  • Remove the jar from the heat, let it cool and then let it sit on my kitchen windowsill for ages (a week or two should be more than enough if you want to get this accomplished on a quicker schedule)
 On salve making day:
  • Strain the oil through a fine mesh sieve lined with cheesecloth into a glass measuring cup (2 cup size or larger)
  • Once all the oil has drained through, wrap the cheesecloth tightly around the dandelions and squeeze firmly to get out any remaining oil - you'll be surprised how much extra you get!
  • Pour the oil into a small saucepan and heat over medium-low heat until warm
  • Toss in 1-2 ounces of beeswax per cup of oil and stir occasionally until beeswax is totally melted
  • Quickly pour salve into prepared containers (it will start to set very soon after being removed from the heat) 
I used a variety of containers to hold the finished salve:-repurposed Burt's Bee lip balm tins
-a purchased stainless steel tin from Mountain Rose Herbs (largest tin pictured - that's an affiliate link!)
-another repurposed stainless steel tin from previously purchased salve (medium tin pictured)
-a couple of 125 mL Mason jars

Reusing tins is, of course, very frugal and environmentally friendly; however I will be the first to admit that cleaning them up is a big pain in the rear end! If your tins have previously held lip balm or salve, it can be a sticky gooey mess of epic proportions (especially if you have an old tin of salve that got pushed to the back of the cupboard for the better part of a decade to fester - not that I'd know anything about that ::grin::)

To clean up my tins:
  • I use a spoon to scoop out any old contents that are no longer useable (i.e. festering salve noted above). I then take a small piece of paper towel and rub out as much remaining salve or balm as possible. 
  • At this point I dump all the tins into a boiling pot of water for about 5 minutes, then pour out the water (which will have some oily stuff floating around in it that came off the tins).  
  • I refill the pan with hot soapy water and scrub off any remaining sticky stuff, then rinse well and reboil again for another 5 minutes. After the second boil I drain the tins then dry them thoroughly with a paper towel (there will usually be a little bit more salve/balm residue that comes off). 
It is a bit of a production and the cleaning usually takes longer than the actual salve making, but I have a bunch of nice clean tins to reuse in the end!

I now have a whole lot of dandelion salve as you can see from the photo above! The smaller tins will all be gifts and the large tin and two Mason jars will be our household supply. I am pretty sure we will not run out before the dandelions reappear next spring :)

This salve is supposed to be excellent as a gardener's balm and on any really dry chapped skin in general. It is also said to be effective as a sore muscle rub and for arthritic joints although I can't personally attest to its effectiveness for those uses. I've been rubbing it into my hands and cuticles every night before bed and it's defnitely helping my "gardener's hands"!

Anyone else out there making salves? Do you have a favourite combination of flowers or herbs to infuse in them? 

Love what you read here? Find out how you can help support this blog. 

Want to stay connected in between blog posts?

Click HERE to follow me on Pinterest 

Click HERE to follow me on Twitter

Click HERE to like Abundance on a Dime on Facebook and get updates and tips on living frugally

Click HERE to like Cheap Appétit on Facebook and get updates and tips on frugal eating and cooking

Wednesday, November 23, 2011

Make Your Own All-Natural Lip Balm for Less Than 25 Cents a Tin!

 Everything you need to make your own lip balm and hard lotion

Every once in a while I try out something new that really rocks my world. This weekend I had such an experience when I made my own lip balm for the first time. It was actually a side project of making my own hard lotion, which I have been promising to make for quite some time now. I finally got around to it, and I am beyond thrilled with the results!

This project is great on just about every level: it uses only 3-4 ingredients (depending on whether or not you add essential oils), it's very simple to do, and you get a whole whack of high quality, natural moisturizing products for less than ten bucks. I hope you can understand how exciting this is for someone who lives in a part of the world where winter can be very long, cold and punishing to your skin :) And I can promise you, you will never go back to one of those nasty petroleum-based balms or fork over a ridiculous amount of money for a natural balm again after you've tried out this stuff.

What you'll need to make your lip balm and hard lotion:
(My recipe is adapted from the one on the MadeOn Skin Care Products site)

Coconut oil
Cocoa butter (the pure stuff, not a cocoa butter lotion)
Beeswax
Essential oil of choice (optional)

Some type of double-boiler system (I used a small stainless steel bowl inside a small pot)
A kitchen scale to weight out the ingredients
Molds for the hard lotion and tins or small containers for the lip balm

In my area, coconut oil is easy to find and beeswax is available at the health food store. The pure cocoa butter is the most difficult item to track down (I got mine at Well.ca).

As far as the molds go, I used an ice cube tray for the hard lotion and reused a bunch of old lip balm containers plus a few other small containers I had around the house for the lip balm. To reuse old lip balm containers, wipe out any residue with a paper towel, then boil the containers for several minutes - this will help melt any remaining residue off and make sure there aren't any bacteria lurking around in there. Wipe dry thoroughly with a clean paper towel and they're ready to refill!

What you do:

Weight out equal proportions of the coconut oil, cocoa butter and beeswax (I used 4 ounces of each for the batch I made).

Melt the beeswax in the double boiler (This step took quite a while as I had a big hunk of beeswax to melt; you can grate it if you have a separate grater you won't use for anything else as you'll never get it all off, or buy beeswax pellets rather than the solid block).

Once the beeswax is melted, stir in the coconut oil and cocoa butter; they will melt pretty quickly.

Quickly pour the hot mixture into your hard lotion molds, leaving about 1/4 of the batch behind for lip balm (I think I probably used a bit less than 1/4 of the batch for the balm, but just eyeball it - you really don't need much to make a lot of balm!) Let the hard lotion set up for a couple of hours before removing it from the molds.

To the remaining mixture, add a bit more coconut oil (I tossed in a fairly large spoonful). This will make the lip balm a bit softer so it's easier to apply. Put the mixture back over the double boiler for a minute to get the coconut oil melted in and keep the mixture hot so it doesn't start setting up on you while you're pouring out the lip balm. Remove from the heat and stir in 15-20 drops of essential oil (I used peppermint, which gives the balm an addictive mint-with-a-hint-of-cocoa flavour).

Quickly pour the balm mixture into your tins or containers.

This is what I had when I was done:


14 hard lotion mini-bars plus the equivalent of about 12-13 commercial-sized tins of lip balm (I have 10 containers of balm, but some of them are significantly larger than typical commercially available ones).

Note: My hard lotion popped out of the ice cube tray quite easily, but if you have trouble getting yours out of your mold, try putting it in the freezer for a few minutes as I've heard that helps it come out easier.

I calculated that it cost me just under $10 to make this entire batch of lotion and balm. Since I used less than 1/4 of the batch for the lip balm, that means I got 12-13 lip balms for less than $2.50, or about 19 to 21 cents a tin - for the best lip balm I have EVER tried! 

 Hard lotion bars in a fancy dish for my bathroom counter 

For those of you who aren't familiar with hard lotion, the way you use it is to rub the bar over your skin. Your body heat will cause it to slowly melt, leaving a light oily coating on your skin which will absorb in fairly quickly. My husband, who has always found regular lotion too greasy, loves this stuff and may actually NOT have chapped, flaky hands for the first winter in forever this year. The mild cocoa-honey scent makes it perfect for a unisex family-use household product, too.

Not only will my lips and hands be super-happy all winter, several of my balms and hard lotion bars will be Christmas gifts this year, too. If you look closely at the photo above, you can see the container in the top right hand corner has a silver snowflake sticker on it - which is how I will decorate them for giving.

So, have I convinced you to give this a try, too? I'm willing to bet you'll be as hooked as I am on this homemade balm!

Saturday, October 22, 2011

Clean, Green - and Cheap?!?


I've been using non-toxic cleaning products since long before it was the "in" thing to do, but for some reason it wasn't until much more recently that I became aware of all the nasty things that might be lurking in my personal care products. Over the last couple of years, I've gradually been phasing out products that are less than friendly and replacing them with safer choices. I've found this to be a somewhat daunting task for a variety of reasons.  Many of these safer products are astronomically expensive compared to "mainstream" products, making it a bit difficult to wiggle them into a modest budget. To make matters even more confusing, a lot of those more expensive products that are labeled "natural" and/or "organic" are not any safer than the mainstream stuff - they still have many of the same harmful chemicals in them! And finally, some of the natural products leave a lot to be desired in the performance department - and if they're not effective, I'm certainly not paying a premium price for them!

I eventually came up with a set of criteria for my "ideal" products:

 -rated between 0 and 2 on the Skin Deep Database. This is an excellent, free online resource which allows you to look up over 69,000 personal care products and get a rating from 0-10 of their safety (0-2 is their "low risk" rating).

-Canadian made

-not tested on animals

-manufacturer has signed the Compact for Safe Cosmetics

-product performs well for its intended use

-it's affordable enough for my family to use on a regular basis


Ultimately, I would love the product to meet ALL of the criteria, but that hasn't always been possible so far! The Skin Deep rating, price and performance are my biggest priorities, and after that I try to find a product that will fulfill as many of the remaining criteria as possible.

Before I share the specifics of the products I'm currently using, I'll share my 3 main strategies for keeping costs down:


1. Eliminate as many products as possible from your regimen: Because my personal care routines are pretty simple, I use only a small number of products, which helps keep expenses (and bathroom clutter) to a minimum.


2. Look for homemade options first: I have been successful in making several of my own products, all of which are extremely inexpensive compared to commercial products. They all work great, and I can customized them to exactly meet my own needs and preferences.

3. Buy in bulk where possible. Once you've found a product you love, buying it in the largest size available will often yield substantial savings (sometimes reducing the cost by 50% or more).

I also have a little opportunity for my readers to save some money at Well.ca. You'll notice I've linked to them a few times further on in the post (those are NOT affiliate links). They are a great online Canadian company, and have a HUGE selection of natural products, as well as offering free shipping anywhere in Canada with no minimum purchase. I have a coupon code I can offer you for $10 off a $40 purchase if you're a new customer. It's not supposed to be posted on public sites, so if you'd like the code just email me at abundanceonadime AT gmail DOT com and I'll happily send it to you!

So, without further ado, here are my current favourite all-natural personal care products:

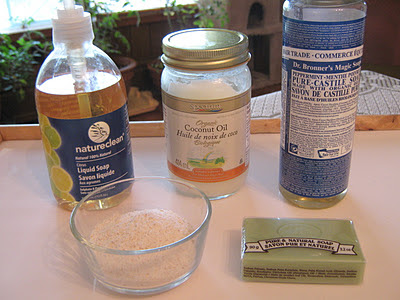
Liquid hand soap: Nature Clean Citrus Liquid Soap. I totally love this stuff! Not only does it have a great clean citrusy scent, it meets every single one of my criteria, making it about as perfect as a product can get. It's also supposed to be available in a 3 litre refill jug, which would help reduce the cost and packaging, but so far I've yet to track it down anywhere I shop.

Bar Soap: Guelph Soap Company Eucalyptus and Mint Bar Soap. This soap is made less than an hour away from me and it's a great bargain for a natural soap! I've seen many natural bar soaps priced from $5-7 a bar, which is just not realistic for my family's budget. I purchased this soap for $1.59 a bar (you have to buy a pack of six to get it at this price, but it's worth it!). My husband and I both use it for shaving. It has a rich, creamy lather and doesn't dry out my skin. It's also a nice solid bar which doesn't melt away to nothing like a lot of other soaps do.

Body wash: I've been using Nature Clean Body Wash which I received as a gift. It's a pretty good product as far as meeting my criteria, but I've been underwhelmed by the scent. I'm planning to switch to Dr. Bronner's Organic Citrus Liquid Soap when I run out of my current body wash. As an added bonus, it's an extremely versatile product; I've been using their peppermint liquid soap in my homemade cleaning products as well as for handwashing and pretreating laundry.

Facial cleanser: I make my own "cleansing grains" (pictured in the glass dish above) using my adaptation of Crunchy Betty's winter face scrub. I make it with just the rice flour, oats and coconut with whatever essential oils I feel like adding (my current favourite is grapefruit) and I'll add calendula and/or chamomile if I happen to have some around. I've been using this for about a year now, and my skin has been wonderfully soft ever since (I gave it to my sisters-in-law for Christmas last year, and they all raved about it!)

Moisturizer: I use coconut oil on my face and body. People with less mature skin than I might find it a bit heavy, in which case grapeseed oil might be a better option. I've been looking in vain for a good affordable heavy-duty hand moisturizer for the winter months and I'm planning to try my hand at making some hard lotion any time now (I'll report back on how it goes!)

Deodorant: My husband and I have been using this homemade deodorant for about a year and a half now and we both love it. I like to add some essential oils to give it a pleasing scent - equal parts lavender and grapefruit for me, tea tree and peppermint for hubby. Our two boys have started using it too, now that they're old enough to need it!

My two remaining holdouts are toothpaste and shampoo/conditioner. I have really sensitive teeth and haven't found anything that works as good as the toothpaste I've been using since I was a kid. And I have a hard time finding hair care products that work well for my thick, curly, frizz-prone hair (I've tried the no 'poo thing with little success). I have my eye on the Yes to Carrots line as a possibility when I've used up my current shampoo stash.

Do you have some favourite personal care products or recipes to recommend? Please share in the comments!

Saturday, February 19, 2011

Beat the End-of-Winter Blahs with a Do-It-Yourself Spa Night


Yesterday was one of those gorgeous days when nature gives you a 24-hour reprieve from winter: Ten degrees Celsius, with lots of bright, warm sunshine. It was heavenly. Today, we're back to sub-zero temperatures, overcast skies, and howling wind. That little taste of spring has me longing for more, and knowing that more than likely we'll still see a good share of snow/freezing rain/other random nasty precipitation before spring arrives for good.

If now isn't the perfect time for a little body-focused indulgence, I don't know when is! After all, that cold, dry air is really hard on our poor skin. And not only does a spa night rejuvenate you on the outside, it gives you a great mental boost, too. Best of all, it doesn't have to make a big dent in your pocketbook (after all, we have those winter heating bills to contend with, too!) For less than the price of a coffee at Starbucks, you can treat  yourself to an evening of head-to-toe pampering.

Step One: Tame those fingernails
Take a few minutes to file your nails into shape, then (if you have a nail buffer handy), buff them to a shine. Then soak your fingers for a few minutes in a bowl of warm water with 1 tbsp olive oil added to it.

Step Two: The Frugalista Facial

First, clean your face. My favorite cleansing method right now is my tightwad version of Crunchy Betty's Winter Face Scrub (I make mine with just the rice flour, oats, and coconut, with calendula and chamomile thrown in if I have some around).

Once your face is clean, it's time for a steam: Fill a heat-proof bowl with boiling water. If you have a chamomile tea bag handy, throw it in. Add a few drops of essential oil, too, if you want (lavender is my favorite for relaxing). Hold your face over the bowl for a few minutes, with a towel held over your head to form a "tent" to hold in the steam.

The final part of the frugal facial is a moisturising mask: Slather some honey over your face and leave on for 15-20 minutes, then rinse off. I like to leave the mask on while I move on to step three!

Step 3: The Skin-Softening Soak
Run a nice hot bath, adding equal parts dry milk powder and baking soda (I use about 1/3 - 1/2 cup of each). Once again, you can add some essential oil if you like. Make sure you have a good book close at hand, as well as a cup of tea (I prefer a mint-green tea blend for this occasion). Climb on in and stay there for as long as you can get away with.


Step 4: Tenderize those Tootsies!
It's time to pay your hard-working feet some attention. Trim your nails if needed. Now treat them to an exfoliating scrub. Combine 2 tbsp salt, 2 tbsp ground oats, 2 tbsp ground coconut and 1 tbsp baking soda (I reserve a coffee grinder for doing the fine grinding). Add just enough water until it forms a paste, then rub vigorously all over your feet for a couple of minutes. Rinse off, then apply a heavy moisturizer (I like olive or coconut oil). For an extra treat, you can give yourself a short foot massage while you're at it, too. Once you're finished, put on a pair of socks so you don't slide all over the floor.

Step 5: Full-Body Moisturizing
Moisturize the rest of your body (you can use olive or coconut oil here, too) and don't forget to rub some into your nails and cuticles! Now put on your comfiest pajamas and chill out for the rest of the evening with a good book or movie.

Got some frugal body-pampering secrets to share? I'd love to hear them, so please leave a comment and tell me all about them.

Tuesday, January 25, 2011

How To Make Your Own Menstrual Pads in Five Minutes

Okay, okay, some of you are going "eeeeeeew" right about now. I've been meaning to write a post about this for a while, but I've been dragging my heels about it because I know for some people this topic has a high ick factor.Before you decide to skip past this post and on to your next favourite blog, let me say that I wish I'd been smart enough to do this years ago as I've been very pleased with the results.

At the end of December, I wrote that making my own menstrual pads was one of my top frugal successes of last year. It's something I'd been meaning to get around to for years. Both the expense and the amount of waste created by disposable products really got under my skin. I'd tried The Keeper several years ago, and unfortunately it just didn't work out for me (although I know many others for whom it works great). So, ever since then I'd been planning to make my own pads...and never quite getting around to it. I'm a reluctant sewer at best, and my never-ending mending pile is about all I manage to accomplish with a needle and thread most of the time.

Yes, you can buy pre-made reusable cloth pads, but holy cow, are they expensive! Being the tightwad that I am, there's just no way I was forking over that much dough for something I knew I could make myself! So, finally, a few months ago, when "that time of the month" caught me by surprise and I realized I was out of disposable products, the light bulb went on. I came up with a super quick and easy solution that, after five minutes' work, left me with several comfortable, absorbent homemade pads.

Here's how I did it:

Materials:
old polar fleece top or blanket (fabric should still be soft and not "pilled")
a few old washcloths or a couple of old cotton T-shirts (the thicker the cotton, the better)

Fleece and T-shirt material are ideal for this project, as they won't fray around the edges after cutting, even without hemming or zig zag stitching the edges. The terry cloth will fray slightly, but not enough for me to bother doing anything about it (I've been using my pads made with terry cloth for several months now and the fraying has been minimal).

Instructions:

If using washclothes, cut them into quarters like so:

If you're using an old T-shirt, cut out pieces roughly the same size as 1/4 of a washcloth. These are going to be the liner pieces for your pads.

Now cut out pieces of fleece slightly larger than the washcloth/T-shirt pieces:


Fold the liner pieces into thirds:


Then wrap the outer fleece portion around them:

Voila! Your very own homemade pads, ready in five minutes and it didn't even cost you a thing.

I store them folded up like this so they're ready to grab and go. To use one, place the folded-up liner piece on the crotch of your panties, then wrap the fleece piece over it with the ends on the underside of the crotch. Pin in place with small safety pins (one at the top and one at the bottom work fine for me). I hope those are sufficient directions as I'm not posting a photo of my underwear on the internet - a girl's gotta draw the line somewhere :)

I've found these to be surprisingly comfortable to wear (much more so than disposable products). They are adequately absorbent for my needs (if you have a really heavy flow, you might want to use 2 liner pieces rather than one). I don't find them overly bulky, and I can't feel the safety pins at all when I'm wearing them (even when riding my bike). The only drawback to these is they're a bit fiddly (but certainly not impossible) to change while you're actually wearing your underwear (if I'm at home I take my undies completely off to pin a fresh one in place).

These pads have been very easy to wash, too. I find the polar fleece naturally stain resistant and after several months of use they are not stained at all. It's important to rinse/soak the pads in cold water only, as warm or hot water will set blood stains. I rinse them briefly when changing them, then soak them in cold water with a bit of Dr. Bronner's or homemade laundry detergent tossed in (an old ice cream tub with a lid stashed in a discreet corner of your bathroom is perfect for this). On laundry day, I simply give them a final rinse then toss them in the wash.

Overall, I've been extremely pleased with these and so glad I came up with this simple solution! I would love to hear other people's experiences with reusable/homemade menstrual products if you care to share them here.
Related Posts with Thumbnails