Showing posts with label Baking. Show all posts

Thursday, February 27, 2014

RECIPE: Orange Cardamom Oatmeal Scones

With all due respect to last week's post on embracing these last weeks of winter, the fact that we're being offered up temperatures of -20°C in the final days of February is a little hard to take.

Orange Cardamom Oatmeal Scones to the rescue! These scones came out of the oven so fragrant that it seems tragic that you can't smell them in the photo. A bit denser than an all-flour scone, bursting with flavour from the orange and cardamom, with an extra ray of sunshine (and a bit of chewiness) from the apricots, these are just what you need to hang in there until the weather decides to hand us a warm, sunny day. Even better, these come together in next to no time, so you don't have any excuse not to whip up a batch immediately :)

I've come to the momentous decision that I'm in the "square scone" camp rather than the "pie shaped scone" camp (earth-shattering, I know). I find it easier both to shape and to eat the square ones, and they just look more robust and appealing to me somehow :) I found this method of layering the dough to give a nicely risen, pleasantly plump scone perfect for slicing in half and slathering with butter and jam. Make sure you use *cold* butter for these; you want to create little buttery pockets in the dough for maximum yumminess!

Ingredients:
1¾ cups all-purpose flour
1 cup rolled oats
¼ cup sugar
1 tsp baking soda 
1 tsp cardamom
½ tsp salt
¼ cup butter (cold, not softened)
½ cup finely chopped apricots
½ cup orange juice
¼ cup milk or light cream
1 egg
approximately 1 tbsp light cream for brushing tops

Instructions:
  • In a medium mixing bowl, combine the flour, oats, sugar, baking soda, cardamom and salt.
  • With a pastry blender, 2 forks, or your fingers, cut in the butter until crumbly (it should be in pea-sized lumps) then add the apricots
  • Beat together the orange juice, milk and egg; add to flour mixture and stir gently until a wet dough forms (it should be sticky but hold together well enough for you to pick it up in one big lump)
  • Turn dough out onto a lightly floured counter and pat it into a roughly 9" circle. Fold one side of dough in to the centre, then fold the other side completely over the top of the first (so you now have a rough log shape with 3 layers of dough)
  • Pat the dough log into a 4" x 12" shape; cut into six 2" x 4" pieces then cut each of those pieces in half to give you twelve 2" x 2" scones.
  • Place scones on a parchment-lined baking sheet. Brush tops with cream and bake at 400°F for 15 minutes or until golden brown on top.
Makes 12 scones

Mountain Rose Herbs. A herbs, health and harmony c 
Love what you read here? Click HERE to see the ways you can help support this blog (many of them won't cost you a thing!) 

Want to stay connected in between blog posts?

Click HERE to sign up for my Cook with Karen newsletter (max 2 emails a month)

Click HERE to follow me on Pinterest 

Click HERE to follow me on Twitter

Click HERE to like Abundance on a Dime on Facebook and get updates and tips on living frugally

Click HERE to like Cheap Appétit on Facebook and get updates and tips on frugal eating and cooking

Wednesday, November 28, 2012

Make it From Scratch: School-Friendly Granola Bars


As some of you are aware, my younger son, who has previously been homeschooled, decided to go to public school this year. This has brought about a number of changes for our family, not the least of which is that I have to pack a nut-free lunch for him five days a week.

Granola bars are standard fare for school lunches and since you know I'm way too cheap to buy premade ones (plus most of the store bought ones are full of questionable ingredients) I've been on a quest for a good homemade granola bar recipe that: a) only uses staple items from my pantry and b) doesn't contain peanut butter, which happens to be an ingredient in the majority of recipes I think look most promising! Yes, I could sub in some sunflower seed butter for the peanut butter, but I'd rather save it for making sandwiches on days when I don't have any other options handy.

After a little experimenting, I've come up with these bars, which are good and oaty, and have a satisfying texture (a bit chewy with a hint of crunchiness on top). You can easily change out the dried fruits and seeds to create a variety of flavour combos.

Ingredients:

3-6 tbsp of brown sugar (adjust depending on your desired level of sweetness)
1/4 cup honey
1/4 cup butter
1 tsp vanilla
2 cups rolled oats (I use old fashioned, but quick oats would probably work fine)
1/2 cup raisins
1/2 cup coconut
1/4 cup sunflower seeds
1/4 cup pumpkin seeds (pepitas)
1 tsp cinnamon
1/2 - 1 tsp ginger (I prefer it with the higher amount, but I'm a ginger addict!)

Instructions:

In a small saucepan, combine the brown sugar, honey and butter over medium-low heat, until butter melts and mixture is thoroughly blended together. Remove from heat and add vanilla.

In a medium bowl, combine oats, raisins, coconut, sunflower and pumpkin seeds, cinnamon and ginger. Pour honey-butter mixture over top and stir until oat mixture is thoroughly coated.

Press firmly into a greased 9" x 9" pan (I put a bit of butter on my fingers to do this so the mixture doesn't stick to me!) Bake at 350F for 20 minutes. Let cool to room temperature before cutting into bars.

Makes 12 granola bars (I cut them into 6 pieces in one direction and in half the other direction to get a proper "long and skinny" granola bar shape).

Wednesday, March 23, 2011

RECIPE: Upside-Down Apple Oven Pancake


Okay, okay, this is the second pancake recipe I've posted in the past couple of weeks. What can I say? I love breakfast! And being the frugalista that I am, I love that it's easy to make a really impressive breakfast dish for very little cost. This one is nice enough for guests - it can even do double-duty as a simple dessert with some ice cream and caramel sauce on top!

Ingredients:
1/4 cup butter
3-4 medium apples, peeled and sliced
1/2 cup flour
3 eggs, separated into yolks and whites
1/2 cup milk
1/2 tsp almond extract
1/4 cup sugar

Instructions:
  • In a 9 x 13” glass baking dish or two 9” pie plates, melt the butter in oven heated to 425°F.
  • Peel and slice apples; arrange apple slices in a single layer on top of melted butter.
  • Place flour in a medium bowl. Beat together egg yolks, milk and almond extract; whisk into flour until well combined.
  • In a large bowl, beat egg whites with electric mixer until foamy. Gradually add sugar, 1 tablespoon at a time, and continue beating until soft peaks form.
  •  Gently fold egg whites into batter; spread evenly over top of apple slices.
  •  Bake for 15-20 minutes or until pale golden brown on top.
  •  Loosen edges with knife and invert onto serving plate (if making in a 9x13” dish, I find it easier to cut into slices first, then invert each individual slice onto a dessert plate).
Serves 8.

I shared this recipe at Recipe Swap Thursday Full Plate ThursdayFrugal Food Thursday, Fat Camp Friday, Friday Favorites, the GCC Recipe Swap and Sweets for a Saturday.

Wednesday, March 16, 2011

RECIPE: Cream Cheese Brownies


I *love* cheesecake desserts, but many of them are quite expensive to make, calling for several bricks of cream cheese. This is a good way to get my cheesecake fix while using only a single brick. Even better, that creamy layer is resting atop a dense and fudgy chocolate brownie - dessert perfection!!
 
Ingredients:
Brownie layer:
3 oz chocolate chips
1/2 cup butter
1 1/4 cups sugar
2 eggs
1/2 cup flour
1 tsp vanilla
1/4 tsp salt 

Cream cheese layer:
8 oz cream cheese
1/4 cup sugar
1 egg
1 tsp vanilla

Instructions:
Line a 9x9" pan with parchment paper.
To make the brownie layer:
In a large saucepan, melt together the butter and chocolate chips. Cool to room temperature. Add sugar, eggs, flour, vanilla, and salt, stirring until well combined. Set aside 1/2 cup batter, then pour remaining batter in prepared pan, spreading evenly.
To make the cream cheese layer:
With an electric mixer, beat cream cheese until light and fluffy. Add sugar, egg and vanilla and beat until smooth. Carefully pour over top of brownie layer in pan. Dollop spoonfuls of reserved brownie batter over cream cheese layer, then swirl gently with a knife. Bake at 325F for 25 minutes, or until cream cheese layer is just barely set (be careful not to overbake!). Cool on wire rack to room temperature, then chill in refrigerator for several hours before cutting into squares.
Makes 16 brownies.

I shared this recipe at Frugal Food Thursday Full Plate Thursday, It's a Keeper Thursday, Recipe Swap Thursday, the GCC Recipe Swap, Fat Camp Friday and Friday Favorites.

Wednesday, February 16, 2011

RECIPE: Aloha Muffins


 I figure that by the middle of February almost all of us could use a little taste of the tropics. One bite of these muffins and you'll magically be transported to a distant exotic beach (okay, that might be stretching it a bit, but they are darn good muffins!)

Ingredients: 
1 1/2 cups flour
1/2 cup toasted wheat germ
1/2 cup sugar
3/4 cup unsweetened coconut
1 tsp cinnamon
1 tsp ginger
2 tsp baking powder
1 tsp baking soda
1/4 tsp salt
1 egg
1/4 cup canola or vegetable oil
1 cup mashed ripe banana (3 medium bananas)
1 cup *undrained* crushed pineapple
1 tsp vanilla

Instructions:
In a medium bowl, combine the flour, wheat germ, sugar, coconut, cinnamon, ginger, baking powder, baking soda, and salt. In a small bowl, combine the egg, oil, banana, crushed pineapple and vanilla. Gently stir into the flour mixture just until combined. Divide batter between 12 well-greased muffin cups. Bake at 400F for 25 minutes or until golden brown and tops spring back when lightly touched.

Makes 12 muffins.

Hungry for more muffins? Try these:
Banana Chocolate Chip Muffins
Rhubarb Muffins
Lemon Poppyseed Muffins
Chocolate Zucchini Muffins

I shared this recipe at Full Plate ThursdayFrugal Food Thursday, Recipe Swap Thursday, It's A Keeper Thursday, the GCC Recipe Swap, Fat Camp Friday, Friday Favorites and Sweets for a Saturday.

Saturday, January 15, 2011

Why It's Worth It To Bake Your Own Bread


I've been a bread-baker for a long time; I've been cranking out homemade loaves for well over a decade now. We eat store-bought bread so infrequently that my kids protest whenever I pull out one of those purchased-on-sale-and-stashed-in-the-freezer emergency loaves for those times when I fall behind on my breadmaking schedule. They're so used to the freshly baked goodness of a homemade loaf that the store-bought stuff is vastly inferior in their eyes.
So, making your own bread is definitely worth it just from a quality perspective. Heck, it might even be worth it just because of the way it makes your house smell! That being said, there's no denying the financial advantages of home baked bread. I've always known that making my own bread saved a lot of money, however until recently I hadn't bothered to calculate the exact savings. 

Here's the cost breakdown for a batch of my Whole Wheat Refrigerator Dough (which makes 3 loaves of bread):

5 tsp yeast (purchased in bulk) = 28.8 cents
1/2 cup sugar = 11 cents
1 cup mashed potatoes = 12.6 cents
1/2 cup canola oil = 24 cents
1 egg = 17 cents
3 tbsp ground flax seed (purchased in bulk) = 5.5 cents
1 1/2 tsp salt = 1.4 cents
4 cups whole wheat flour (purchased in bulk) = 33.6 cents
3 1/2 cups white flour (purchased in bulk) = 30.8 cents

Total cost for a batch = $1.65, or 55 cents per loaf.

In comparison, a loaf of decent-quality bread costs $1.99 on sale, and it doesn’t go on sale for that price very often. Since our family of four generally goes through the equivalent of 6 loaves of bread per week (or 24 loaves a month), it’s difficult to stockpile enough in the freezer to get us through from one sale to the next (plus I’d rather dedicate that freezer space to other items). 

Monthly cost savings of making my own bread:
24 loaves of sale priced bread @ 1.99/loaf = $47.76
24 loaves of homemade bread @ 0.55/loaf = $13.20

$47.76 - $13.20 = $34.56
Now, if you have a very large grocery budget you might not find that a huge savings. On our modest grocery budget of $375 a month, a nearly $35 savings per month on a single food item is huge - that's nearly 10% of our total budget!

Making bread using my refrigerator dough method is easy and convenient, and for our family it is well worth the minimal effort involved. It's also an activity I enjoy doing, and it even makes a great gift.

Do you make your own bread? If not, have I convinced you to give it a shot?

Tuesday, November 30, 2010

Make It From Scratch: Sweetened Condensed Milk


Now that holiday baking season is in full swing, I thought I would share a recipe for making your own sweetened condensed milk. I have a few recipes that call for this product, and it can get expensive even if you buy a store brand!

Fortunately, it's quick and easy to make your own (for a fraction of the cost). Here's how:

Ingredients:
1 cup instant skim milk powder
2/3 cup sugar
3 tbsp butter
1/3 cup boiling water

Instructions:
In a medium-sized heatproof bowl, combine the milk powder, sugar and butter. Carefully add the boiling water and beat with an electric mixer or whisk until smooth. I usually let this cool for a couple of hours in the fridge before using.

Two of my favourite ways to use sweetened condensed milk are in these Neapolitan Coconut Strips and Magic Cookie Bars. How do you like to use it?

Wednesday, November 10, 2010

RECIPE: Garlic & Cheddar Biscuits


I think I get a bit obsessed with breads in the fall and winter - not only are they the perfect accompaniment for the soups, stews, and casseroles that are staple fare this time of year, the act of baking them provides a welcome boost of heat to the kitchen, taking the edge off the season's chill.

A couple of weeks ago I shared my recipe for Basil & Oregano Flatbread. Here is another one of our family favourites, a quick drop biscuit you can easily throw together while dinner is simmering away on the stovetop. The extra step of sauteing the garlic in the butter does dirty another frying pan, but the results are well worth it!

Ingredients:
2 cups flour
1 tbsp sugar
1 tsp baking powder
1 tsp baking soda
1/2 tsp salt
3 tbsp butter
2 cloves garlic, minced
1 cup milk
3 tbsp mayonnaise
3/4 cup grated cheddar

Instructions:
In a medium bowl, combine the flour, sugar, baking powder, baking soda and salt. In a small frying pan, melt the butter, then saute the garlic in the butter *very* briefly (about 20 seconds) - be careful not to over brown it! Add the garlic/butter mixture, milk, and mayonnaise to the flour mixture, stirring gently just until combined. Fold in the cheddar cheese. The dough will be sticky and moist. Using a soup spoon, drop generous spoonfuls of dough about 1" apart on a parchment-paper lined baking sheet (you should get 12 biscuits from one batch of dough). Bake at 375F for 15-20 minutes or until golden brown.

I shared this recipe at Tasty Tuesday, the GCC Recipe Swap, the Pantry Recipe Swap and Friday Favorites.

Tuesday, July 27, 2010

RECIPE: Peach Clafouti


I've had recipes for clafouti in my recipe box for years; it wasn't until last summer that I actually tried making one. A clafouti is a French dessert that's somewhere between a custard and a cake. It's traditionally made with cherries; you can use just about any type of summer fruit in this delicious dessert, though!

Since clafouti is both extremely tasty *and* quick and inexpensive to make, it's become one of my go-to summer desserts.

Ingredients:
3 cups sliced fresh peaches
3 eggs
1/2 cup milk
1/2 cup light (10%) cream
3/4 cup flour
1/4 cup sugar
1/4 cup butter, melted
1/2 tsp almond or vanilla extract
1/8 tsp salt
icing sugar (optional)

Preheat oven to 350F. Grease a 2 quart casserole or baking dish. Arrange the peach slices in the bottom of the dish. In blender, combine remaining ingredients. Blend until smooth and pour over peaches. Bake for 40-50 minutes, or until puffed and golden brown. Dust with icing sugar before serving if desired. Serve warm.

This is probably supposed to serve 6-8, but I confess the four of us always polish the whole thing off in one go :)

I shared this recipe at Tasty Tuesday, Foodie Friday, Friday Favourites and the GCC Recipe Swap.

Thursday, July 15, 2010

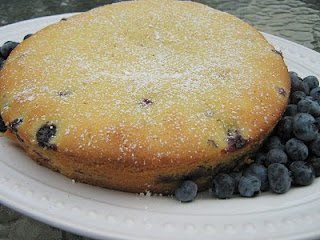
RECIPE: Lemon Blueberry Polenta Cake


I have to begin by saying that this is quite possibly the best cake I have EVER made! And considering that I've been baking for 30 years, that's fairly impressive. Even my two boys gave it their highest ranking, putting it ahead of anything chocolate (even my chocolate peanut butter brownies!). So in other words, I highly recommend you make yourself some Lemon Blueberry Polenta Cake as soon as possible. And I'm not just saying that because I invented it :)

This recipe will make two 8" cakes - one to share and one to keep all for yourself! Or if you have a bit more willpower, you can stash the second one in the freezer to pull out on a day when a dose of Lemon Blueberry Polenta Cake is just what the doctor ordered.

This is a moist, dense cake with a lovely texture (courtesy of the cornmeal). You could use raspberries, blackberries or sliced strawberries in place of the blueberries. Heck, I think I'm going to try it with chopped peaches or cherries. I can't imagine any of them being better than the blueberries, though!

Ingredients:

1/2 cup butter, softened
1 1/2 cups sugar
1/2 cup olive oil
4 eggs
1 1/2 tsp almond extract
zest and juice of 1 lemon
2 cups flour
1 cup cornmeal
1/2 tsp baking soda
1/2 tsp baking powder
1/2 tsp salt
1 pint fresh blueberries
icing sugar for dusting (optional, but makes your cake look extra-fancy)

Preheat oven to 350F. In a large mixing bowl, cream butter and sugar together. Add olive oil and eggs and beat for a minute or so. Add almond extract and lemon juice and zest. In a separate bowl, stir together flour, cornmeal, baking soda, baking powder and salt.  Add flour mixture to egg mixture gradually, beating on a medium-low speed until well combined.

Line two 8" round baking pans with parchment paper. Fill each pan a bit less than half full with batter. Sprinkle blueberries over batter in a single layer (you should use a full pint between the two cakes). Pour remaining batter over blueberries and carefully smooth it over the top of the fruit to cover completely.

Bake for about 45 minutes, or until golden brown on top and cake no longer has any "jiggly" bit in the centre. Cool on a wire rack for 30-60 minutes, then carefully flip out of pans and onto rack to cool further (although you probably won't be able to wait any longer to start eating it!) Dust with icing sugar before serving if you have guests for dinner :)

I shared this recipe at Foodie Friday and Friday Feasts.

Monday, July 5, 2010

RECIPE: Chocolate Zucchini Muffins

These were such a huge hit with my family that I didn't even get a chance to snap a photo of the first batch before they disappeared. The second batch didn't last a whole lot longer but I did sneak in a photo op before they all got gobbled up!

1 1/2 cups flour
3/4 cup sugar
1/4 c cocoa
1/2 tsp baking soda
1/4 tsp baking powder
1/2 tsp salt
1 tsp cinnamon
1/8 tsp nutmeg
1/8 tsp cloves
2 eggs (or 1 egg plus 1 heaping tablespoon of soy flour and a tablespoon of water)
1/3 cup canola oil
1/2 cup milk
1 tsp vanilla
generous 1 cup grated zucchini

chopped nuts and chocolate chips for sprinkling on top (optional)

In a medium bowl, combine the flour, sugar, cocoa, baking soda, baking powder, salt and spices. In a small bowl, combine the eggs, oil, milk and vanilla. Add the egg mixture to the dry ingredients, stirring gently until well combined. Fold in the zucchini. Spoon into greased muffin cups and sprinkle with nuts and chocolate chips (if using).Bake at 375F for 20 minutes, or until tops spring back when lightly touched.

(Note: if you use frozen grated zucchini, you might not need to use as much milk - add 1/4 cup then gradually add more if needed to get the batter a proper consistency).

Do you have a favourite way to use up an abundance of zucchini? Please share in the comments :)

This recipe is linked to Tasty Tuesday, Tuesdays at the Table and Tempt My Tummy Tuesday.

Monday, May 10, 2010

RECIPE: Pull-Apart Garlic & Parmesan Breadsticks

I whipped these up to go with a spaghetti dinner last week and my family thought they'd died and gone to heaven! An enticing bread can make even an "ordinary" meal seem extra special. Fortunately, these breadsticks are quick and easy to prepare, so you can be rewarded with lots of "oohs" and "ahs" without having to go to a lot of trouble. Get them rising before you start your main meal prep, and they'll be done in time to serve them fresh from the oven.

Ingredients:

1 loaf worth (1/3 recipe) Whole Wheat Refrigerator Dough
1/4 cup melted butter
2-3 cloves garlic, minced
2-4 tbsp Parmesan cheese

Drizzle a small amount of the butter in the bottom of a 7x11" lasagna pan, and spread around so the entire bottom of the pan is coated. Divide the bread dough into 12 equal portions. Using your hands, roll out each portion into a long, skinny rope just a bit shorter than the width of your lasagna pan. Place the breadsticks in the pan, arranging them so they are evenly spaced across. Add the minced garlic to the remaining butter and drizzle over top of the breadsticks, then sprinkle the Parmesan cheese over top. Cover with a clean kitchen towel and let rise for about 15-20 minutes. Bake at 375F for 20-25 minutes or until golden brown on top.

Thursday, June 19, 2008

RECIPE: Rhubarb Muffins

Judging by how quickly these are disappearing from my kitchen, this one is a winner! The rhubarb is from our CSA share.

Time: 20 minutes prep
20 minutes baking

Makes 12 muffins

Ingredients:

1 cup all purpose flour
1 cup whole wheat flour
3/4 cup brown sugar
1 tsp baking soda
1 tsp baking powder
1/4 tsp salt
1 egg
1 tsp vanilla
1/4 cup canola oil
3/4 cup buttermilk
1 1/2 cups finely chopped rhubarb

Topping:
1 tbsp melted butter
1/4 cup white sugar
1 tsp cinnamon

Preparation:

1. In a medium bowl, combine flours, brown sugar, soda, powder and salt. Mix well.

2. In a separate small bowl, combine egg, vanilla, oil, buttermilk and rhubarb.

3. Make a well in the center of the flour mixture. Add rhubarb mixture and gently stir until just moistened.

4. Spoon mixture into greased muffin cups.

5. Combine topping ingredients and sprinkle over muffin tops, pressing topping lightly into muffin batter.

6. Bake at 400 degrees F for 20-25 minutes or until tops spring back when lightly touched.

"Use What You've Got" Tip:
-If you don't have buttermilk on hand, put 1/2 tbsp vinegar in the bottom of your measuring cup, then add regular milk to make 3/4 cup
-I've also used half milk/half plain yogurt or half milk/half sour cream in place of buttermilk with good success (in baked goods)

Monday, April 28, 2008

RECIPE: Banana Chocolate Chip Muffins

It's easy to get stuck in a breakfast rut (cold cereal and bagels, anyone?) but with just a tiny bit of effort, you can enjoy something much more scrumptious. These are guaranteed to fill your kitchen with a delicious aroma - your family will thank you! You can get these ready for the oven in about 10 minutes. I get these baking before I jump in the shower - by the time I'm done, they are just about finished. You can also make the batter up the night before and refrigerate, then bake the next morning.

Time: 10 minutes prep, plus 20 minutes baking
Makes: 1 dozen muffins

1 cup flour
1 cup quick cooking rolled oats (NOT instant!)
½ cup wheat germ
½ cup sugar
2 tsp baking powder
1 tsp baking soda
2 eggs
¼ cup cooking oil
¼ cup milk
1 cup mashed bananas
1 cup chocolate chips

In a medium-sized bowl, mix together the flour, oats, wheat germ, sugar, baking powder and soda. Make a well in the centre. In a separate bowl, mix together eggs, oil, milk and bananas until well combined. Add banana mixture to flour mixture, stirring until just moistened. Fill greased muffin cups 2/3 full. Bake at 400°F for 20-25 minutes or until golden and tops spring back when lightly touched.

Tip: When your bananas get over-ripe, toss them in the freezer as-is. When you're ready to bake with them, partially thaw, then slice the banana open lengthwise to remove it from the peel.

Related Posts with Thumbnails