Showing posts with label desserts. Show all posts

Thursday, December 19, 2013

Homemade Christmas: Healthy (*AND* Decadent) Holiday Truffles

If you're still looking for a great food gift you can whip up at the last minute, this recipe should fit the bill. Not only is it quick and easy, the basic recipe can be adjusted to accommodate a wide range of dietary needs (it's naturally dairy- and egg-free, and can be made nut- or gluten-free, too).

One of our favourite new treats this year is the Chocolate Powerball recipe I created back in the spring. They taste very sinful but are packed full of nutritious ingredients! They're so good I decided they are gift-worthy, so I took my original recipe and gilded the lily a bit to make them extra-special for the holidays. I added dried cranberries and some extra spices to make them more festive.

I love this recipe for many reasons, not the least of which is the many ways you can customize it to suit your own tastes. You could add some orange extract (or even some rum extract if it's intended more for adult tastes). You can use just about any type of nut butter in these; cashew or almond butter would make them extra decadent! Also, you could substitute ground nuts for some or all of the rolled oats or quinoa.

I doubled the quantities in this version of the recipe so you have enough to share around (plus a few for yourself!) Also, I tried rolling these in cocoa for a more traditional truffle look, but it didn't work out too well, so I'd recommend either the coconut or ground nuts for coating them. 

Ingredients:
1 cup honey
1/2 cup coconut oil
1/2 cup cocoa powder
1 cup peanut butter or sunflower seed butter (or any nut butter of choice)
1 cup coconut
1 cup *uncooked* rolled oats or *cooked* quinoa
1/3 cup finely chopped dried apricots
1/3 cup dried cranberries
1 tsp cinnamon
1/2 tsp ginger
1/2 tsp cardamom
1/4 tsp nutmeg
1/4 tsp cloves
coconut for coating

Instructions:
In a medium saucepan, combine the honey, coconut oil, cocoa powder and sunflower seed or peanut butter.

Heat over medium-low heat just until mixture blends together well.

Remove from heat  and add coconut, oats, apricots, cranberries, cinnamon, ginger, cardamom, nutmeg and cloves.

Chill for about 45 minutes or until mixture firms up enough to roll into balls (I just stick a wooden cutting board under the saucepan and put it in the fridge).

Shape teaspoon-sized amounts of mixture into balls; roll in coconut. Store in refrigerator.

Makes about 4-5 dozen balls. 

If you missed the earlier installments of my Homemade Christmas series, check out Create Your Own Tea Blends, this super-luxurious Chocolate Orange Whipped Body Butter, a lovely Lavender & Calendula Face Scrub, and for the menfolk, a Bay Rum Aftershave Balm. For even more holiday ideas, you can find my whole Christmas on a Dime series HERE. 

This may end up being the last time I post before Christmas, so I want to wish you all a wonderful holiday.  I appreciate each and every one of you and I'm glad you stop by every once in a while to read my ramblings :)

MERRY CHRISTMAS!


Mountain Rose Herbs. A herbs, health and harmony c 
Love what you read here? Click HERE to see the ways you can help support this blog (many of them won't cost you a thing!) 

Want to stay connected in between blog posts?

Click HERE to sign up for my Cook with Karen newsletter (max 2 emails a month)

Click HERE to follow me on Pinterest 

Click HERE to follow me on Twitter

Click HERE to like Abundance on a Dime on Facebook and get updates and tips on living frugally

Click HERE to like Cheap Appétit on Facebook and get updates and tips on frugal eating and cooking

Wednesday, May 1, 2013

RECIPE: Chocolate Power Balls


Ever since I bought a jar of sunflower seed butter that both of my kids promptly rejected as a sandwich filling, I've been trying to find a way to use it up that my family would deem palatable. It would be even better if it was something that made a tasty, transportable snack suitable for my son's school lunch and other nut-free environments.

These Whole Food No Bake Cookies looked promising, so I gave them a try. I found they came out too soft and "gloppy" for my liking and did not hold their shape well at all as a cookie.

I thought they might do better in ball form (kind of like a truffle) and decided to tweak the recipe to pack in a few more goodies for extra nutrition and overall yumminess.

I have to say that these are a new favourite snack at our house. They hold up well in my son's lunchbox and make a great afternoon pick-me-up for us busy moms, too. Best of all, they are very easy to make (although that may be a bit of a downfall as it's a bit *too* easy to gobble them up and whip up another batch).

This is also a great recipe for messing around with; you could use any type of nut butter if you don't need a nut-free option, and any type of dried fruit would work well in place of the apricots. You could also sneak in some ground flax seed or just about anything powdered and mild flavoured (you know, those things your kids - or you - really don't want to eat on their own). I like to use a darker, stronger tasting honey like wildflower or buckwheat in these balls, but any honey you have should do just fine!

Ingredients:
1/2 cup honey
1/4 cup coconut oil
4 tbsp cocoa powder
1/2 cup sunflower seed butter (or any nut butter of choice)
1/2 cup coconut
1/2 cup *uncooked* rolled oats or *cooked* quinoa
1/3 cup finely chopped dried apricots
1/2 tsp cinnamon
1/2 tsp ginger
coconut for coating

Instructions:
In a small saucepan, combine the honey, coconut oil, cocoa powder and sunflower seed butter.

Heat over medium-low heat just until mixture blends together well.

Remove from heat  and add coconut, oats, apricots, cinnamon and ginger.

Chill for about 30 minutes or until mixture firms up enough to roll into balls (I just stick a wooden cutting board under the saucepan and put it in the fridge).

Shape teaspoon-sized amounts of mixture into balls; roll in coconut. Store in refrigerator.

Makes about 2 dozen balls.

Do you have a favourite easy-to-make lunchbox treat? I'd love to know what it is!

For more simple, tasty and family-friendly recipes like this one, check out my book: Cheap Appétit: The Complete Guide to Feeding Your Family for Less Than $400 a Month (While Eating Better Than You Ever Thought Possible)

DID YOU KNOW? I now have an events page! Come find out where you can catch up with me at a signing, seminar, workshop or food demo HERE.

Love what you read here? Find out how you can help support this blog. 

Want to stay connected in between blog posts?

Click HERE to follow me on Pinterest 

Click HERE to follow me on Twitter

Click HERE to like Abundance on a Dime on Facebook and get updates and tips on living frugally

Click HERE to like Cheap Appétit on Facebook and get updates and tips on frugal eating and cooking

Thursday, April 25, 2013

RECIPE: Easy Blueberry Oatmeal Squares


My family loves blueberries. My family loves oats. It seemed like a good idea to combine the two. One Sunday when both my energy levels and my pantry were fairly depleted and I needed to come up with a simple dessert using what we had on hand, I created these delicious squares. It's hard to go wrong when you combine oats, fruit, and lots of butter :)

Fruit and oats are such a happy match, and you could use just about any type of fruit that strikes your fancy instead of the blueberries. Raspberries, peaches, or a strawberry-rhubarb combo would all be delightful I think (and trying out all of these possibilities will give me plenty of excuses to make these squares again!)

Ingredients:

Filling:
2 cups blueberries, fresh or frozen (I prefer the wild ones)
1/2 cup sugar
1/4 cup orange juice
2 1/2 tbsp cornstarch

Oat mixture:
1 1/4 cups all-purpose flour
1 1/2 cups rolled oats
1 cup brown sugar
1 tsp baking soda
1/2 tsp salt
1 cup butter, softened

Instructions:
To make the filling, combine blueberries, sugar, orange juice and cornstarch in a small saucepan. Cook over medium heat, stirring frequently, until mixture thickens.

In a large mixing bowl, combine the flour, oats, sugar, baking soda and salt. Cut in butter until crumbly. Press 1/2 of the mixture into a greased 9" x 9" pan.

Spread filling evenly over oat mixture; sprinkle remaining oat mixture over top and press down lightly.

Bake at 350F for 30 minutes or until golden brown on top.

Let cool to room temperature before cutting into squares.

Makes 16 squares.

For more simple, tasty and family-friendly recipes like this one, check out my book: Cheap Appétit: The Complete Guide to Feeding Your Family for Less Than $400 a Month (While Eating Better Than You Ever Thought Possible)

DID YOU KNOW? I now have an events page! Come find out where you can catch up with me at a signing, seminar, workshop or food demo HERE.

Love what you read here? Find out how you can help support this blog. 

Want to stay connected in between blog posts?

Click HERE to follow me on Pinterest 

Click HERE to follow me on Twitter

Click HERE to like Abundance on a Dime on Facebook and get updates and tips on living frugally

Click HERE to like Cheap Appétit on Facebook and get updates and tips on frugal eating and cooking

Friday, March 9, 2012

RECIPE: No-Bake Ancient Grain Snacking Squares


As I'm the mother of 12 and 14 year old boys who eat like it's going out of style, I'm always on the lookout for quick and easy recipes for snacks that are relatively nutritious and calorie-dense enough to fill the vast void of their empty stomachs for more than 15 minutes.

These squares are super easy to prepare and with their blend of protein and carbs are great for a pre- or post- sports snack. Of course, they're good just about any other time, too! They will not stand up well to warm temperatures, so don't stuff one in your pocket or take them hiking on a hot summer day or you'll have a big mess on your hands.

Feel free to mess around with this basic recipe as much as you'd like. Any type of puffed cereal (like wheat or rice) can be substituted for the kamut and millet. In fact, you can use just about any type of cereal, and I've even made a batch with my homemade granola. Any type of nut butter would probably work in place of the peanut butter, and you could do a nearly infinite number of combinations of nuts, seeds and dried fruit. If you want them a bit more on the spicy side, try adding more cinnamon, some ground ginger, or some finely chopped crystallized ginger. If you find a particularly delicious combination, be sure to let me know, okay?

Ingredients:
3/4 cup honey
1 cup peanut butter
1 cup semisweet chocolate chips
1/2 tsp cinnamon
1 1/2 cups puffed kamut
1 1/2 cups puffed millet
1 cup salted peanuts
1 cup raisins

Instructions:
In a large saucepan, melt honey, peanut butter, chocolate chips and cinnamon together over medium-low heat. Remove from heat and stir in kamut, millet, peanuts and raisins.

Press into a greased 9 x 9" pan and chill until firm. Cut into 16 squares.

For over 125 more quick and easy family-friendly recipes just like this one, check out my book!

I shared this recipe at Friday Favorites, the GCC Recipe Swap and Sweets for a Saturday.

Wednesday, January 25, 2012

RECIPE: Pumpkin Gingerbread


There seems to be an endless supply of pumpkin puree in our freezer right now, so I'm always on the lookout for a new way to use it up. We are all big fans of gingerbread, so I decided to try adding some pumpkin into the mix. It was a big hit with my gang ! Due to the spiciness of the cake, the pumpkin taste is not overly strong, so I think even people who don't particularly care for pumpkin would still like this!

Ingredients:
2 cups all-purpose flour
1/4 cup brown sugar
1/4 cup white sugar
1 tsp baking soda
1 tsp cinnamon
1 tsp ginger
1/2 tsp cloves
1/4 tsp nutmeg
1/2 cup melted butter
1/4 cup molasses
1 egg
1 cup pumpkin puree

Instructions:
In a medium bowl, combine the flour, sugars, baking soda and spices. In a small bowl, combine the butter, molasses, egg and pumpkin puree. Gently stir the pumpkin mixture into the flour mixture just until combined. Pour into a greased 9" square pan and bake at 350F for 40-45 minutes or until top springs back when lightly touched.

Enjoy warm or cold, preferably with whipped cream, ice cream, or custard on top :)

I shared this recipe at Full Plate Thursday and the GCC Recipe Swap.

Thursday, December 22, 2011

My Favourite Holiday Pie


I know most families have a "must have" dessert that absolutely needs to grace their Christmas table to make the holiday complete. For many of us, it's a pie that fits into this category, and it's no different at my house. I first made this Cranberry-Apple Pie several years ago and it was such a huge hit with everyone it's now our traditional holiday dessert. It's such a festive colour and a perfect blend of sweet and tart - the ideal combination to finish off Christmas dinner!

Cranberry-Apple Pie

Pastry dough for a double crust, 9" pie

1 1/2 cups cranberries (fresh or frozen)
1 1/2 cups chopped, peeled apple
1 cup raisins
1/4 cup butter
1/3 cup packed brown sugar
1/3 cup granulated sugar
1 tsp cinnamon
1/4 tsp nutmeg
pinch of salt
3/4 cup water, divided
1 tbsp cornstarch
1 tsp rum extract (optional)

Instructions:
In a medium saucepan, combine the cranberries, apple, raisins, butter, sugars, cinnamon, nutmeg and 1/2 cup water. Cook over medium heat, stirring occasionally, for about 10-15 minutes (until cranberries burst). Combine cornstarch and remaining 1/4 cup water; add to saucepan and cook, stirring constantly, until filling is thickened. Remove from heat and add rum extract (if using).

Roll out half of the pastry dough and fit into a 9" pie plate, leaving extra pastry around edges of plate. Add filling. Use remaining pastry dough to make a lattice topping (instructions here if you need them!).

Bake pie at 400F for 40-45 minutes or until golden brown. I like to give this at least an hour to cool before serving so it's not too runny. Serve topped with whipped cream or vanilla ice cream.

I shared this recipe at Full Plate Thursday

Looking for more great recipes? Check out my recipe index (scroll down the page a bit to get to it) and my brand new book!

Wednesday, April 13, 2011

RECIPE: Impress-the-Guests Pavlova


If you're looking for a showstopping dessert that is both easy and inexpensive to prepare, look no further! Pavlova has become our traditional Easter dessert, and for good reason. The different components can be prepared a day or two in advance, with the final assembly taking just a couple of minutes. I haven't yet served it to anyone who hasn't loved it, and it's a light and refreshing dessert after a heavy meal like Easter dinner.

The recipe can look a bit intimidating as there are several different layers, but each step is quite easy, so don't let that scare you off. You can easily make the meringue shell one day and the pudding the next, and whip the cream and slice the fruit the day of the meal.

Ingredients:

Meringue shell:
1 cup sugar
1 tbsp cornstarch
3 egg whites at room temperature (save yolks for the pudding)
1/8 tsp salt
1 tsp vinegar
1/2 tsp vanilla

Lemon Pudding:
¾ cup sugar
¼ cup cornstarch
2 cups milk
½ cup light cream
3 egg yolks (reserved from making the meringue)
juice and finely grated zest of 2 lemons
2 tbsp butter

3-4 cups sliced berries (strawberries, raspberries, blueberries, or a combination)

1 cup whipping cream, whipped


Instructions:
Make the meringue shell:  
·      Trace an 8” circle onto parchment paper (use an 8” round cake pan as a guide). Flip the paper over (so trace marks are on underside) and place on a baking sheet.
 
·      In a small bowl, combine sugar and cornstarch.

·      In a large bowl, combine egg whites and salt. Beat with electric mixer until they hold soft peaks. Beat in sugar mixture, 1 tablespoon at a time.

·      Add vinegar and vanilla and beat until meringue is glossy and holds stiff peaks, about 5 minutes.

·      Spread meringue in a circle on the parchment, using tracing as a guide. Mound the edges to make them higher, making the meringue “nest” like (the indentation in the middle will hold the filling)..

·      Bake meringue at 300°F for about 45 minutes or until slightly golden with a firm crust on the outside (the inside will still be softer and marshmallow-like).

·      Turn off oven and leave meringue in oven one hour longer to cool. Remove from oven and cool to room temperature. (The meringue shell can be made 2-3 days in advance; store in a cool, dry place in an airtight container until ready to serve).

Make the pudding:
·      In a medium saucepan, combine the sugar and cornstarch. Whisk in the milk and cream.

·      Cook over medium-low heat, whisking constantly, until mixture begins to thicken.

·      In a small bowl, beat egg yolks. Add about ½ cup of hot milk mixture to egg yolks and stir until combined.

·      Add egg mixture to saucepan and continue to whisk until mixture thickens completely.

·      Remove from heat and stir in lemon juice, zest and butter. Pour into a medium bowl and refrigerate until thoroughly chilled (at least 2 hours or up to 2 days in advance of serving). 

Assemble the Pavlova:
Place meringue on serving dish. Spoon pudding into centre of meringue, then top with berries. Spoon cream over top.

Serves 6-8.

I shared this recipe at Tasty Tuesday, What's On the Menu Wednesday, Frugal Food Thursday, Full Plate Thursday, the GCC Recipe Swap, Fat Camp Friday, Friday Favorites and Sweets for a Saturday.

Wednesday, March 23, 2011

RECIPE: Upside-Down Apple Oven Pancake


Okay, okay, this is the second pancake recipe I've posted in the past couple of weeks. What can I say? I love breakfast! And being the frugalista that I am, I love that it's easy to make a really impressive breakfast dish for very little cost. This one is nice enough for guests - it can even do double-duty as a simple dessert with some ice cream and caramel sauce on top!

Ingredients:
1/4 cup butter
3-4 medium apples, peeled and sliced
1/2 cup flour
3 eggs, separated into yolks and whites
1/2 cup milk
1/2 tsp almond extract
1/4 cup sugar

Instructions:
  • In a 9 x 13” glass baking dish or two 9” pie plates, melt the butter in oven heated to 425°F.
  • Peel and slice apples; arrange apple slices in a single layer on top of melted butter.
  • Place flour in a medium bowl. Beat together egg yolks, milk and almond extract; whisk into flour until well combined.
  • In a large bowl, beat egg whites with electric mixer until foamy. Gradually add sugar, 1 tablespoon at a time, and continue beating until soft peaks form.
  •  Gently fold egg whites into batter; spread evenly over top of apple slices.
  •  Bake for 15-20 minutes or until pale golden brown on top.
  •  Loosen edges with knife and invert onto serving plate (if making in a 9x13” dish, I find it easier to cut into slices first, then invert each individual slice onto a dessert plate).
Serves 8.

I shared this recipe at Recipe Swap Thursday Full Plate ThursdayFrugal Food Thursday, Fat Camp Friday, Friday Favorites, the GCC Recipe Swap and Sweets for a Saturday.

Wednesday, March 16, 2011

RECIPE: Cream Cheese Brownies


I *love* cheesecake desserts, but many of them are quite expensive to make, calling for several bricks of cream cheese. This is a good way to get my cheesecake fix while using only a single brick. Even better, that creamy layer is resting atop a dense and fudgy chocolate brownie - dessert perfection!!
 
Ingredients:
Brownie layer:
3 oz chocolate chips
1/2 cup butter
1 1/4 cups sugar
2 eggs
1/2 cup flour
1 tsp vanilla
1/4 tsp salt 

Cream cheese layer:
8 oz cream cheese
1/4 cup sugar
1 egg
1 tsp vanilla

Instructions:
Line a 9x9" pan with parchment paper.
To make the brownie layer:
In a large saucepan, melt together the butter and chocolate chips. Cool to room temperature. Add sugar, eggs, flour, vanilla, and salt, stirring until well combined. Set aside 1/2 cup batter, then pour remaining batter in prepared pan, spreading evenly.
To make the cream cheese layer:
With an electric mixer, beat cream cheese until light and fluffy. Add sugar, egg and vanilla and beat until smooth. Carefully pour over top of brownie layer in pan. Dollop spoonfuls of reserved brownie batter over cream cheese layer, then swirl gently with a knife. Bake at 325F for 25 minutes, or until cream cheese layer is just barely set (be careful not to overbake!). Cool on wire rack to room temperature, then chill in refrigerator for several hours before cutting into squares.
Makes 16 brownies.

I shared this recipe at Frugal Food Thursday Full Plate Thursday, It's a Keeper Thursday, Recipe Swap Thursday, the GCC Recipe Swap, Fat Camp Friday and Friday Favorites.

Thursday, February 3, 2011

Make It From Scratch: Old-Fashioned Butterscotch Pudding


I don't know about you, but in the dead of winter I start craving the comfort of old-fashioned desserts. Puddings are high on my list because they are quick to prepare and provide near-instant gratification (if you're the sort of person who likes to eat pudding warm). I don't care for commercially prepared butterscotch puddings (either ready-to-eat or from a mix) but I adore this homemade version. It's a delicately-flavoured and not-too-sweet pudding; my older son would be quite happy to eat this every day if given the opportunity!

Ingredients:
3/4 cup brown sugar
1/4 cup cornstarch
1/8 tsp salt
2 cups milk
1/2 cup light (10%) cream
1 egg
2 tbsp butter
1 1/2 tsp vanilla

Instructions:

In a medium saucepan, mix together the brown sugar, cornstarch and salt. Whisk in the milk and cream. Cook over medium-low heat, stirring constantly, until mixture starts to thicken.

In a small bowl, beat the egg. Add about 1/2 cup of the hot milk mixture to the egg and mix well. Pour the egg mixture back into the pot and continue to stir constantly until mixture thickens.

Remove from heat and add butter and vanilla, stirring until well blended and butter is completely melted.

Pour into serving dishes. Serve warm or chilled as you prefer.

Serves 4.

I shared this recipe at Full Plate Thursday, the GCC Recipe Swap, Friday Favorites, Fat Camp Friday and Sweets for a Saturday.

Tuesday, September 21, 2010

RECIPE: Amish Oatmeal Pie


When I first stumbled across a recipe for Oatmeal Pie, I was pretty skeptical about how it would taste. There's a variation of this dessert in almost every Amish cookbook I've come across, though, so I figured it must be reasonably palatable! Everyone in my family loved it, and seeing as how it calls for very inexpensive ingredients that are pantry staples, I was happy to add it to my repertoire of Tightwad Desserts :) The raisins and coconut are optional but delicious additions to this dish.

Ingredients:
Pastry for a single crust 9" pie 

1/2 cup butter, melted
3/4 cup brown sugar
2 eggs
3/4 cup honey or corn syrup
1 cup rolled oats
1/4 tsp salt
1/2 cup raisins
1/2 cup coconut

Instructions:
Roll out pie crust and fit into pie plate.

In a medium bowl, combine butter, brown sugar, eggs, honey, and oats. Stir until well combined. Fold in raisins and coconut. Pour filling into prepared pie crust. Bake at 375F for 40-45 minutes, or until golden brown.

I shared this recipe at Tasty Tuesday, the GCC Recipe Swap, Friday Favorites, and Sweets for a Saturday.

Tuesday, August 24, 2010

RECIPE: Raspberry Cream Cheese Squares


I don't know about you, but I'm a sucker for a good cheesecake. Unfortunately, most cheesecakes use several packages of cream cheese, which, even if purchased on sale at rock-bottom prices, still add up to one expensive dessert! So, I save the decadence of a real cheesecake for special occasions. In between, I get my "cheesecake fix" by making recipes such as this one, that uses only one package of cream cheese while still delivering that smooth, creamy goodness!

These squares have a white cake-y bottom and a yummy cream-cheese-and-raspberry topping, with just a hint of almond. They're even quick and easy to prepare! So go ahead and whip up a batch :)

Ingredients:

Base:
1 cup sugar
1/2 cup butter
2 eggs
1 tsp almond extract
2 cups flour
1/2 tsp baking powder

Topping:
8 oz pkg cream cheese
1/4 cup sugar
1 egg
1/3 cup raspberry jam

Instructions:
Preheat oven to 350F.
Make the base: In a medium sized bowl, cream butter and sugar together. Add eggs and almond extract and beat until fluffy. Stir in flour and baking powder; mix until well combined. Spread evenly in greased 9" square baking pan.
Make the filling: Beat together cream cheese, sugar and egg. Spread carefully over batter in pan. Drop spoonfuls of jam onto mixture and swirl gently into cheese mixture.
Bake for 35 minutes or until lightly golden on top and toothpick inserted in centre comes out clean. Cool, then cut into squares. Store in refrigerator.

I shared this recipe at Tasty Tuesday, the GCC Recipe Swap, Friday Favorites and Sweets for a Saturday.

Tuesday, July 27, 2010

RECIPE: Peach Clafouti


I've had recipes for clafouti in my recipe box for years; it wasn't until last summer that I actually tried making one. A clafouti is a French dessert that's somewhere between a custard and a cake. It's traditionally made with cherries; you can use just about any type of summer fruit in this delicious dessert, though!

Since clafouti is both extremely tasty *and* quick and inexpensive to make, it's become one of my go-to summer desserts.

Ingredients:
3 cups sliced fresh peaches
3 eggs
1/2 cup milk
1/2 cup light (10%) cream
3/4 cup flour
1/4 cup sugar
1/4 cup butter, melted
1/2 tsp almond or vanilla extract
1/8 tsp salt
icing sugar (optional)

Preheat oven to 350F. Grease a 2 quart casserole or baking dish. Arrange the peach slices in the bottom of the dish. In blender, combine remaining ingredients. Blend until smooth and pour over peaches. Bake for 40-50 minutes, or until puffed and golden brown. Dust with icing sugar before serving if desired. Serve warm.

This is probably supposed to serve 6-8, but I confess the four of us always polish the whole thing off in one go :)

I shared this recipe at Tasty Tuesday, Foodie Friday, Friday Favourites and the GCC Recipe Swap.

Thursday, July 15, 2010

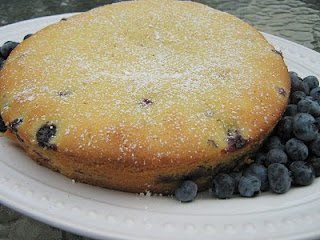
RECIPE: Lemon Blueberry Polenta Cake


I have to begin by saying that this is quite possibly the best cake I have EVER made! And considering that I've been baking for 30 years, that's fairly impressive. Even my two boys gave it their highest ranking, putting it ahead of anything chocolate (even my chocolate peanut butter brownies!). So in other words, I highly recommend you make yourself some Lemon Blueberry Polenta Cake as soon as possible. And I'm not just saying that because I invented it :)

This recipe will make two 8" cakes - one to share and one to keep all for yourself! Or if you have a bit more willpower, you can stash the second one in the freezer to pull out on a day when a dose of Lemon Blueberry Polenta Cake is just what the doctor ordered.

This is a moist, dense cake with a lovely texture (courtesy of the cornmeal). You could use raspberries, blackberries or sliced strawberries in place of the blueberries. Heck, I think I'm going to try it with chopped peaches or cherries. I can't imagine any of them being better than the blueberries, though!

Ingredients:

1/2 cup butter, softened
1 1/2 cups sugar
1/2 cup olive oil
4 eggs
1 1/2 tsp almond extract
zest and juice of 1 lemon
2 cups flour
1 cup cornmeal
1/2 tsp baking soda
1/2 tsp baking powder
1/2 tsp salt
1 pint fresh blueberries
icing sugar for dusting (optional, but makes your cake look extra-fancy)

Preheat oven to 350F. In a large mixing bowl, cream butter and sugar together. Add olive oil and eggs and beat for a minute or so. Add almond extract and lemon juice and zest. In a separate bowl, stir together flour, cornmeal, baking soda, baking powder and salt.  Add flour mixture to egg mixture gradually, beating on a medium-low speed until well combined.

Line two 8" round baking pans with parchment paper. Fill each pan a bit less than half full with batter. Sprinkle blueberries over batter in a single layer (you should use a full pint between the two cakes). Pour remaining batter over blueberries and carefully smooth it over the top of the fruit to cover completely.

Bake for about 45 minutes, or until golden brown on top and cake no longer has any "jiggly" bit in the centre. Cool on a wire rack for 30-60 minutes, then carefully flip out of pans and onto rack to cool further (although you probably won't be able to wait any longer to start eating it!) Dust with icing sugar before serving if you have guests for dinner :)

I shared this recipe at Foodie Friday and Friday Feasts.
Related Posts with Thumbnails