Showing posts with label natural health. Show all posts

Wednesday, February 5, 2014

Frugal Superfoods #2: The Amazing Avocado


I'm long overdue for another installment in my Frugal Superfoods series. Way back in May, I kicked things off with my post about the wonders of the humble green pea.

This time I'd like to shine the spotlight on one of my favourite foods: the amazing avocado.

I came to this wonderful food rather late in life. Nary an avocado passed through the door of my parents' house when I was growing up, and I had never even tasted guacamole until well into adulthood. To be honest, I can't recall exactly when or where I had my first avocado experience, but after doing the research for writing this post, I'm really glad that I usually eat half an avocado several days per week!

In my area, 5 packs of avocados routinely go on sale for right around $3, sometimes $2.49, and occasionally even closer to $2. That means I'm generally paying about 50-60 cents per avocado. That's less than half the price of a candy bar, while packing in an amazing list of health benefits.

Avocados contain an impressive array of nutrients: Monounsaturated fats, potassium (surprisingly, more than bananas by weight!), Vitamin K, Vitamin C, Vitamin E, folate, copper, plus a whopping 11 grams of fibre per medium avocado.

They have also been shown to have a wide range of health benefits:

Eye health: They are a good source of lutein, a carotenoid which helps protect against eye disease.

Weight loss/maintenance: Some studies have shown that people who eat avocados weigh less than those that don't. One reason for this may be that they're high in oleic acid, a fat that activates the part of your brain that makes you feel full.

Increased nutrient absorption: Some studies have shown that adding 1 cup of avocado to a salad can boost absorption of lycopene and beta-carotene 200-400%!

Decreased risk of diabetes, stroke and heart disease: There is strong support for avocado's role in helping prevent these all-too-common diseases.

Cancer prevention: Avocados contain a wide range of beneficial phytochemicals which are known to prevent cancer. In addition, some interesting research has shown that avocados can actually encourage the death of cancer cells while promoting the health of normal cells - that's pretty cool :)

Anti-inflammatory properties: A number of the nutrients found in avocados are anti-inflammatory, which means they can help prevent or minimize symptoms of diseases like arthritis.

If all that wasn't enough, they're pretty darn tasty, too! In addition to the standard guacamole dip, there are plenty of other ways to incorporate avocados into your meals:
  • Add slices to sandwiches and burgers
  • Toss them into almost any kind of salad (green, grain or bean-based)
  • Tuck them into an omelette or add them as a garnish for scrambled eggs

If you want tons more ideas for ways to incorporate avocados into your cooking, check out the recipe page at the California Avocado site,

Do you have a favourite way to eat avocados?

Mountain Rose Herbs. A herbs, health and harmony c 
Love what you read here? Click HERE to see the ways you can help support this blog (many of them won't cost you a thing!) 

Want to stay connected in between blog posts?

Click HERE to sign up for my Cook with Karen newsletter (max 2 emails a month)

Click HERE to follow me on Pinterest 

Click HERE to follow me on Twitter

Click HERE to like Abundance on a Dime on Facebook and get updates and tips on living frugally

Click HERE to like Cheap Appétit on Facebook and get updates and tips on frugal eating and cooking

Friday, January 17, 2014

5 of My Frugal (and Kind of Quirky) Daily Health Habits

If you take a quick flip through any womens' magazine these days, you're likely to get the impression that you have to spend a small fortune on gym memberships, expensive supplements and other "essentials" for good health. This isn't really helpful for anyone whose budget is a bit on the lean side. I absolutely think that many of the most powerful things you can do to support your health are very low cost (or even free!) To illustrate my point, I thought I'd share some examples of my daily health habits that cost little or nothing but that have had a strong impact on my overall wellness.

1. Meditation: This is my new daily habit that I mentioned in my post on my new routines for 2014. I've been really consistent with this so far and am up to 16 minutes now - hurray! Meditation is a tool that's available to absolutely anyone - after all it's completely free and you don't even need any equipment to get started (yes, I know a gorgeous meditation cushion would be nice, but a chair will do just fine). The documented health benefits of daily meditation seem nearly miraculous - it's so powerful that researchers at Harvard found that after 2 months of daily mediation, the genes of the study participants that help fight inflammation, kill diseased cells and protect the body from cancer all began to switch on (more details here). Pretty incredible stuff! Meditation is also known to boost overall immunity and help calm and focus the mind as well as improve memory. With all those benefits, I'm extremely motivated to stick with my new habit :)

2. Oil pulling: This technique has been growing in popularity the past few years, so you *might* have heard it mentioned somewhere. Basically, this practice involves swishing (or "pulling") oil around in your mouth for about 15 minutes or so, first thing in the morning before you eat (organic coconut or sesame oil are most commonly used). Sounds weird, I know, but it's an ancient Ayurvedic practice purported to have many health benefits. The reason I was drawn to it was that I've struggled with oral health issues (despite fastidious oral hygiene) and I thought I didn't have much to lose by giving it a try. My mouth definitely feels the cleanest it ever has after my daily oil pulling (I follow it up by a salt water rinse, then brush my teeth). I do the oil pulling while I'm in the shower, so it doesn't take any "extra" time in and of itself. You can read more about oil pulling here and here if you want to know more about it!

3. Nettle tincture: I began using my own homemade nettle tincture to help with my seasonal allergies this spring, but when I did more research and discovered its wide-ranging health benefits, I decided to make this herb part of my daily life year-round. I take a dropperful of tincture once a day.

4. Afternoon Herbal tea: Okay, drinking herbal tea isn't all that quirky I guess, although the one I brew up for my "afternoon pickup" is a lot different than most of those you will get prepackaged in a box! I wrote in more detail here about exactly what's in my afternoon cup of tea and why I picked those specific ingredients. I've been adding about ¼ - ½ tsp or so of rosehips to this basic blend for an extra immune boost during cold and flu season. This only takes me a couple of minutes to put together and not only is it packed full of health promoting goodness, it's pretty tasty too. If you don't have access to high quality herbs locally, I highly recommend Mountain Rose Herbs - their prices are great and the quality is fantastic. 

5. Acupressure and Energy Medicine: I wrote about this topic almost 3 years ago here on the blog - you can find that post here.  While this goes well beyond quirky for some people :) my personal experience is that these techniques can be extremely powerful. I do a modified version of this 5 minute energy routine developed by Donna Eden as part of my morning routine and I may add in some specific acupressure techniques as well, depending on whether I feel I need some further support in either the physical or mental health department :) Acupressure's usually one of the first things I turn to for acute issues like nosebleeds, motion sickness, headaches, earaches, congestion, etc. as well. If you're interested in trying out acupressure, you can find a variety of YouTube videos on this topic here or for more detailed information the book Acupressure's Potent Points is an excellent resource.

While I have found that all of the above practices have enhanced my personal health and well being, as always I encourage you to do your own research before starting any new health regimen, and consulting with your health practitioners if necessary. And yes, that link to Mountain Rose Herbs is an affiliate link :)
Mountain Rose Herbs. A herbs, health and harmony c 
Love what you read here? Click HERE to see the ways you can help support this blog (many of them won't cost you a thing!) 

Want to stay connected in between blog posts?

Click HERE to sign up for my Cook with Karen newsletter (max 2 emails a month)

Click HERE to follow me on Pinterest 

Click HERE to follow me on Twitter

Click HERE to like Abundance on a Dime on Facebook and get updates and tips on living frugally

Click HERE to like Cheap Appétit on Facebook and get updates and tips on frugal eating and cooking

Wednesday, October 16, 2013

My "Afternoon Pick Me Up" Herbal Tea


I started a new daily ritual back in the spring that I somehow never got around to blogging about: my afternoon herbal tea! Now, that might not seem like anything special since many of us drink herbal teas on a regular basis (myself included). What's special about this one is that I purposely chose to make this blend more for its health benefits than its taste (although it is a very pleasant tasting tea).

My "special blend" is a teaspoon each of dried oatstraw and lemon balm, plus about a teaspoon of finely diced fresh ginger and a quarter of an organic lemon. I put this all in a pint sized Mason jar, then fill with boiling water, cover, and let it steep for about 20 minutes. I then strain it through a fine-mesh sieve into a large mug and sweeten it with a bit of local honey.

How did I arrive at this particular blend? 
Well, for starters, a friend of mine had recommended oatstraw as an herb with a lot of health benefits that she thought would be useful to me, so when I placed an order with Mountain Rose Herbs I added some to my cart even though I wasn't sure how I was going to use it! I was placing a large order that day and so I didn't notice that I'd accidentally ordered *two* 4 oz packages of oatstraw instead of one! Now I was even more motivated to find a way to use it on a regular basis.

I decided to try it in a tea blend with lemon balm, an herb that's known for its ability to relieve tension and anxiety while also perking you up (as opposed to some other relaxing herbs that sedate you!) In other words, it's just about perfect for providing an early afternoon boost to help me get through the rest of the day. I added the lemon and ginger for both taste and further therapeutic benefits and the combination tastes great while delivering some powerful health benefits:

Oatstraw:  This herb is considered a full-body tonic that can strengthen your immune system and boost your energy. It's also said to have antibiotic and antidepressant properties. Like lemon balm, it is good for relieving stress, tension and fatigue. In addition, oatstraw is packed full of nutrients, including vitamin A, thiamin, riboflavin, niacin, vitamin B6, vitamin C, vitamin E, vitamin K, calcium, chromium, iron, magnesium and selenium. 

Lemon Balm: Along with its tension-taming qualities, lemon balm is also antiviral and antibacterial (Caution: regular use of lemon balm is not advised if you have hypothyroidism)

Ginger: I have been a fan of ginger for a long time! It has warming properties, which is nice for people like me who are always cold :) It is also anti-inflammatory, which is useful if you have seasonal allergies or conditions like arthritis.

Lemon: In addition to giving the tea a flavour boost, lemons are antibacterial and help remove acid wastes from the body. I use organic lemons as conventional lemons have a lot of things on the outside of them that I don't want ending up in my tea!

Where to buy the ingredients:
You might be able to find the oatstraw and lemon balm at a local health food store that sells bulk herbs. I buy mine from Mountain Rose Herbs - their quality is fantastic!
It's not too hard to find ginger root or lemons :) I buy 2 lb bags of organic lemons at Fortinos, where they sell them for a reasonable price.

Note: I'm an (extremely) amateur herbalist, and I'm just writing about something that I've found beneficial for myself. I encourage you to do your own research and consult with your healthcare practitioner before using these or any other herbs. This post contains affiliate links to Mountain Rose Herbs and I will receive a small commission from any purchase you make when using those links.

Love what you read here? Find out how you can help support this blog. 

Want to stay connected in between blog posts?

Click HERE to follow me on Pinterest 

Click HERE to follow me on Twitter

Click HERE to like Abundance on a Dime on Facebook and get updates and tips on living frugally

Click HERE to like Cheap Appétit on Facebook and get updates and tips on frugal eating and cooking

Tuesday, July 9, 2013

Small Yet Satisfying #2: Making Dandelion Salve

A whole lot of Dandelion Salve!

I set myself a little goal this weekend: I've decided to take a cyber-free day once a week all summer - most likely on Sundays. When I've taken completely unplugged days before I've found I can be really productive or really relaxed (whichever I had in mind for the day) as I don't have the constant mental pull towards checking my email/Facebook/the internet in general.

While my main purpose in doing this is to feel like I'm getting more downtime to read, ride my bike, chill out on my front porch and spend time with my family, I also thought it would be a good time to focus on getting a few more "Small Yet Satisfying" projects completed as it's amazing how much more time I seem to have in a day when the computer stays off!

My project for this past Sunday was to make myself some Dandelion Salve. I've been meaning to get around to this for ages! I saw this recipe on the Nerdy Farmwife blog when she posted it back in April and was immediately intrigued. I'm always a fan of a recipe that uses a main ingredient I can get for free! I picked a ton of dandelions when they were at their peak earlier this season, and dried them out thoroughly. I even got them infusing in some olive oil and heat-infused them for a couple of hours. They've been sitting in a jar on my kitchen windowsill ever since and it was more than high time for me to get around to actually making the salve.

I've made salves a couple of times before, and found that a ratio of 1 cup olive oil to 1-2 ounces of grated beeswax will make a salve with the consistency I like (in general, it's better to use a bit more beeswax during the summer or if you live in a hot climate, so that the salve doesn't get too soft in the warmer temps).

So, this is roughly how I made the salve:

Infusing stage:
  • Fill a pint jar about 2/3 of the way full of dried dandelion flowers
  • Pour olive oil over top until it covered the dandelions with a tiny bit to spare on top
  • Heat the jar in a saucepan of simmering water for a couple of hours
  • Remove the jar from the heat, let it cool and then let it sit on my kitchen windowsill for ages (a week or two should be more than enough if you want to get this accomplished on a quicker schedule)
 On salve making day:
  • Strain the oil through a fine mesh sieve lined with cheesecloth into a glass measuring cup (2 cup size or larger)
  • Once all the oil has drained through, wrap the cheesecloth tightly around the dandelions and squeeze firmly to get out any remaining oil - you'll be surprised how much extra you get!
  • Pour the oil into a small saucepan and heat over medium-low heat until warm
  • Toss in 1-2 ounces of beeswax per cup of oil and stir occasionally until beeswax is totally melted
  • Quickly pour salve into prepared containers (it will start to set very soon after being removed from the heat) 
I used a variety of containers to hold the finished salve:-repurposed Burt's Bee lip balm tins
-a purchased stainless steel tin from Mountain Rose Herbs (largest tin pictured - that's an affiliate link!)
-another repurposed stainless steel tin from previously purchased salve (medium tin pictured)
-a couple of 125 mL Mason jars

Reusing tins is, of course, very frugal and environmentally friendly; however I will be the first to admit that cleaning them up is a big pain in the rear end! If your tins have previously held lip balm or salve, it can be a sticky gooey mess of epic proportions (especially if you have an old tin of salve that got pushed to the back of the cupboard for the better part of a decade to fester - not that I'd know anything about that ::grin::)

To clean up my tins:
  • I use a spoon to scoop out any old contents that are no longer useable (i.e. festering salve noted above). I then take a small piece of paper towel and rub out as much remaining salve or balm as possible. 
  • At this point I dump all the tins into a boiling pot of water for about 5 minutes, then pour out the water (which will have some oily stuff floating around in it that came off the tins).  
  • I refill the pan with hot soapy water and scrub off any remaining sticky stuff, then rinse well and reboil again for another 5 minutes. After the second boil I drain the tins then dry them thoroughly with a paper towel (there will usually be a little bit more salve/balm residue that comes off). 
It is a bit of a production and the cleaning usually takes longer than the actual salve making, but I have a bunch of nice clean tins to reuse in the end!

I now have a whole lot of dandelion salve as you can see from the photo above! The smaller tins will all be gifts and the large tin and two Mason jars will be our household supply. I am pretty sure we will not run out before the dandelions reappear next spring :)

This salve is supposed to be excellent as a gardener's balm and on any really dry chapped skin in general. It is also said to be effective as a sore muscle rub and for arthritic joints although I can't personally attest to its effectiveness for those uses. I've been rubbing it into my hands and cuticles every night before bed and it's defnitely helping my "gardener's hands"!

Anyone else out there making salves? Do you have a favourite combination of flowers or herbs to infuse in them? 

Love what you read here? Find out how you can help support this blog. 

Want to stay connected in between blog posts?

Click HERE to follow me on Pinterest 

Click HERE to follow me on Twitter

Click HERE to like Abundance on a Dime on Facebook and get updates and tips on living frugally

Click HERE to like Cheap Appétit on Facebook and get updates and tips on frugal eating and cooking

Wednesday, June 5, 2013

An Effective, Cheap and Natural Way to Treat Seasonal Allergies


There are so many things to love about spring - the warm sunny days, the return of garage sales, watching the garden burst into life again. One thing that tends to put a damper on all this goodness is the sniffles and sneezes of spring allergies. Three out of the four members of my family deal with this issue (my younger son is the lucky one who's been spared). For years I have been looking for a natural treatment that was both affordable *and* effective. This year I think I've finally found it. A friend of mine had been urging me to try nettles for at least a couple of years now, and while I was a little slow to follow her advice, this year I made a point of brewing up some nettle tincture before the allergy season started. I wanted to use the tincture for a while to see how well it worked before sharing it here. It has been very effective for all three members of my family that use it, so now that I've gotten good results I feel compelled to pass along our experience. While it does take some time to brew up a tincture, you can have some ready to deal with those later-in-the-season allergies!

Nettles grow wild across North America and most of the rest of the world, too, so if you know how to identify them, you can gather them for free (always be sensible when foraging and never ingest anything unless you're certain you know what it is!) They are also available for purchase at many health food stores and online at Mountain Rose Herbs (yes, that is an affiliate link). Mountain Rose sells 4 ounces of organic nettle leaf (enough to roughly fill a quart Mason jar) for just $3.00.

Nettles are a plant that herbalists believe to have extensive health benefits; if you want to learn about their many other uses there is a good summary here. And remember that, even though they are a natural substance, nettles do have the potential to produce side effects and interact with other drugs and natural treatments, so always consult your healthcare practitioner before using them.

While you can make nettle leaf tea, it's far too "green" tasting for me! I decided to make a tincture instead, which is very simple to do. A tincture is defined as "a medicine made by dissolving a drug in alcohol". In this case, our "drug" is stinging nettle. When making an herbal tincture, you can use precise measurements, or use the "wing it" approach (I chose the latter). This is so simple to do it will only take you about 2 minutes - I got mine brewing while I was talking to my herb-loving friend on the phone!

The simplest way to make a nettle tincture:
  •  Fill a clean quart Mason jar half to 2/3 full of nettle leaves (I used about half of my 4 oz bag) 
  • Pour vodka over top until it just covers the nettles (make sure all the nettles are under the vodka)    
  • Cover and place in a dark, cool cupboard. Check it after a couple of days to make sure all the nettles are still below the vodka, and add a bit more vodka if needed.   
  • Let the mixture "brew" for about 4 weeks.  
  • Line a fine mesh strainer with cheesecloth and pour the mixture through the strainer into a clean glass measuring cup. Once all the liquid has been poured out, gather the cheesecloth around the nettles and squeeze to get out any remaining liquid.

If you have a glass dropper bottle (like the one pictured above that I got from Mountain Rose), this is the best thing to keep tinctures in for dosing them. The remaining tincture can be stored in a clean Mason jar placed back in that dark, cool cupboard.

The total cost for a batch of nettle tincture is roughly $15-20 dollars depending on what brand of vodka you're using (no need to get a pricey one for this purpose!) It will last for quite a while as you take it in small doses. I'm guessing this amount would probably get one person through most of allergy season (4-5 months or so). Compare that to the cost of over-the-counter or prescription medications (or even standard homeopathics or other natural alternatives). It's quite a bargain :)

I have been taking one dropperful of tincture 3 times a day diluted in a small glass of water, which seems to alleviate my allergy symptoms quite well (the effect seems to wear off after about 6 hours, which is what usually prompts me to take another dose!!)

Anyone else out there have experience using nettles to treat allergies? Or have you gotten any other health benefits from using them?

Wednesday, March 13, 2013

Project: Fermentation


I think I have a commitment problem. I'm supposed to be working on The Great Room Shuffling and Reorganization Project, but I got obsessed with distracted by another activity I've been wanting to try for ages: fermenting things.(Does this Project ADD happen to anyone else, or am I the only one?)

Technically I *have* already done plenty of fermenting, as that is the process that takes place when you make yogurt and I've got that one down pat. Somehow, though, taking the step from yogurt making to lacto-fermenting fruits and vegetables was a bit of a leap for me, and I felt quite apprehensive about taking the plunge. One of my close friends happens to be quite experienced at fermenting things, so with her encouragement I finally JUST DID IT!

Lacto-fermentation is actually quite simple. You don't need any special equipment to get started, just some Mason jars, sea salt and your fruits and veggies of choice. Some recipes also call for whey, which you can easily obtain by making yogurt cheese; it's the liquid that drips out, SAVE IT! If you don't use up all your whey fermenting things, there's a list of other ways to use it here. I think the biggest thing to get over when starting to ferment fruits and vegetables is the leaving-jars-of-cut-up-produce-on-the-counter-for-days aspect; we are so conditioned to refrigerate everything in our culture!

The photo above shows my two initial fermented food experiments: a quart jar of cabbage (sauerkraut) and 2 pint jars of fermented lemons. I followed these basic instructions for fermenting the cabbage, and this recipe for the lemons. They have already spent their allotted time on the counter and have been moved to the fridge to "brew" further. I have been told the sauerkraut is usually good to start eating at this point; from what I've read, the lemons usually need a few weeks of fermenting in the fridge before they are ready to enjoy (they become much less salty tasting over time). 

Why bother to ferment foods? It's a very inexpensive way to add more probiotic bacteria to your system. There are many health benefits to increasing the amount of probiotic bacteria in your diet; they improve your gut health as well as your immune system. Probiotics have been shown to boost resistance to colds, flus and infections, and research has also shown a link between probiotic food consumption and lower levels of stress hormones and depression. For more details about the health benefits of fermented foods, check out this article.

Health benefits aside, it's just plain fun to pound a bowlful of cabbage with my meat tenderizer (actually, that just may be conferring some mental health benefits, lol). If you'd like to learn more about how to ferment foods, I recommend Sandor Katz's website, Wild Fermentation, and his book of the same name: Wild Fermentation: The Flavor, Nutrition, and Craft of Live-Culture Foods (yes, that is an Amazon affiliate link!). 

My next lacto-fermentation projects will likely be gingerale, ketchup (because my boys put it on everything!), ginger carrots and this cranberry chutney, which my fermenting-enthusiast friend Linda says is "the bomb" :)

Is anyone else out there a lacto-fermentation enthusiast? What are your favourite foods to ferment?

A NOTE FOR LOCAL READERS: IT'S HERE! My "Feeding Your Family On a Shoestring" course will be running this spring semester through the Continuing Education department at Mohawk College. There will be 4, three hour sessions and you will get to pick my brain about any ...and all aspects of feeding your family well on a small budget. We will be baking bread, making yogurt and flour tortillas, and cooking a variety of healthy, low budget dishes to add to your repertoire. I will also be sharing many tips and strategies for shopping and managing your kitchen to get the most out of your food dollars.

Course fee is $160 which includes a copy of my book, there is also an additional $25 fee for food costs. Classes start Monday April 29th, 7-10 p.m. More details on p. 52 of the spring 2013 Mohawk Continuing Ed calendar or follow this link and click on the "Creative and Visual Arts" section.

For families of four spending more than $700 a month on groceries, this course can easily pay for itself in 1-2 months!


DID YOU KNOW? I now have an events page! Come find out where you can catch up with me at a signing, seminar, workshop or food demo HERE.

Love what you read here? Find out how you can help support this blog. 

Want to stay connected in between blog posts?

Click HERE to follow me on Pinterest 

Click HERE to follow me on Twitter

Click HERE to like Abundance on a Dime on Facebook and get updates and tips on living frugally

Click HERE to like Cheap Appétit on Facebook and get updates and tips on frugal eating and cooking

Saturday, October 6, 2012

Two Easy Things to Do with Fresh Herbs (Before the Frost Sets In)

Aside from a few straggling tomatoes that I'll leave on the vine until we officially get a chance of frost in the forecast, I've harvested just about everything from the garden that I'm going to this year. One exception to that is my herbs, most of which are still growing enthusiastically.

Knowing that I don't have much of a window left before the frost hits, I got myself outside to pick a pile of assorted herbs. Aren't they pretty?


I promptly did two things with them:


1. Packed a couple of clean quart jars with a mix of garlic chives, purple and green basil and oregano. I then poured white vinegar over them and will let them sit for several weeks.

2. Packed a smaller glass jar about half full of lemon thyme to make a honey infusion. I added honey (local, unpasteurized stuff from Dutchman's Gold) to cover the herbs completely, stirring it around a bit to mix. It's now sitting on my kitchen windowsill, where I'll let it brew for a couple of weeks before straining out the herbs. This infused honey will be saved for use as a cough syrup this winter (both honey and thyme are know to help calm a cough).

 
With only a few minutes of effort on my part, in a few weeks I'll have a Christmas gift (herbal vinegar) and a natural cough remedy all ready to go!

What are your favourite end-of-season uses for fresh herbs?

Local readers: If you're reading this in your email or feed reader, I'd like to make sure that you know about my next upcoming "Cheap Appétit" presentation. OPIRG McMaster has kindly sponsored me to speak on the university campus on Wednesday October 10th from 12:30-1:30 p.m. in MUSC 230. Once again I'll have books for sale for $15 each. Please join me if you can!

Love what you read here? Find out how you can help support this blog. 

Want to stay connected in between blog posts?

Click HERE to follow me on Twitter

Click HERE to like Abundance on a Dime on Facebook and get updates and tips on living frugally

Click HERE to like Cheap Appétit on Facebook and get updates and tips on frugal eating and cooking

Saturday, October 22, 2011

Clean, Green - and Cheap?!?


I've been using non-toxic cleaning products since long before it was the "in" thing to do, but for some reason it wasn't until much more recently that I became aware of all the nasty things that might be lurking in my personal care products. Over the last couple of years, I've gradually been phasing out products that are less than friendly and replacing them with safer choices. I've found this to be a somewhat daunting task for a variety of reasons.  Many of these safer products are astronomically expensive compared to "mainstream" products, making it a bit difficult to wiggle them into a modest budget. To make matters even more confusing, a lot of those more expensive products that are labeled "natural" and/or "organic" are not any safer than the mainstream stuff - they still have many of the same harmful chemicals in them! And finally, some of the natural products leave a lot to be desired in the performance department - and if they're not effective, I'm certainly not paying a premium price for them!

I eventually came up with a set of criteria for my "ideal" products:

 -rated between 0 and 2 on the Skin Deep Database. This is an excellent, free online resource which allows you to look up over 69,000 personal care products and get a rating from 0-10 of their safety (0-2 is their "low risk" rating).

-Canadian made

-not tested on animals

-manufacturer has signed the Compact for Safe Cosmetics

-product performs well for its intended use

-it's affordable enough for my family to use on a regular basis


Ultimately, I would love the product to meet ALL of the criteria, but that hasn't always been possible so far! The Skin Deep rating, price and performance are my biggest priorities, and after that I try to find a product that will fulfill as many of the remaining criteria as possible.

Before I share the specifics of the products I'm currently using, I'll share my 3 main strategies for keeping costs down:


1. Eliminate as many products as possible from your regimen: Because my personal care routines are pretty simple, I use only a small number of products, which helps keep expenses (and bathroom clutter) to a minimum.


2. Look for homemade options first: I have been successful in making several of my own products, all of which are extremely inexpensive compared to commercial products. They all work great, and I can customized them to exactly meet my own needs and preferences.

3. Buy in bulk where possible. Once you've found a product you love, buying it in the largest size available will often yield substantial savings (sometimes reducing the cost by 50% or more).

I also have a little opportunity for my readers to save some money at Well.ca. You'll notice I've linked to them a few times further on in the post (those are NOT affiliate links). They are a great online Canadian company, and have a HUGE selection of natural products, as well as offering free shipping anywhere in Canada with no minimum purchase. I have a coupon code I can offer you for $10 off a $40 purchase if you're a new customer. It's not supposed to be posted on public sites, so if you'd like the code just email me at abundanceonadime AT gmail DOT com and I'll happily send it to you!

So, without further ado, here are my current favourite all-natural personal care products:

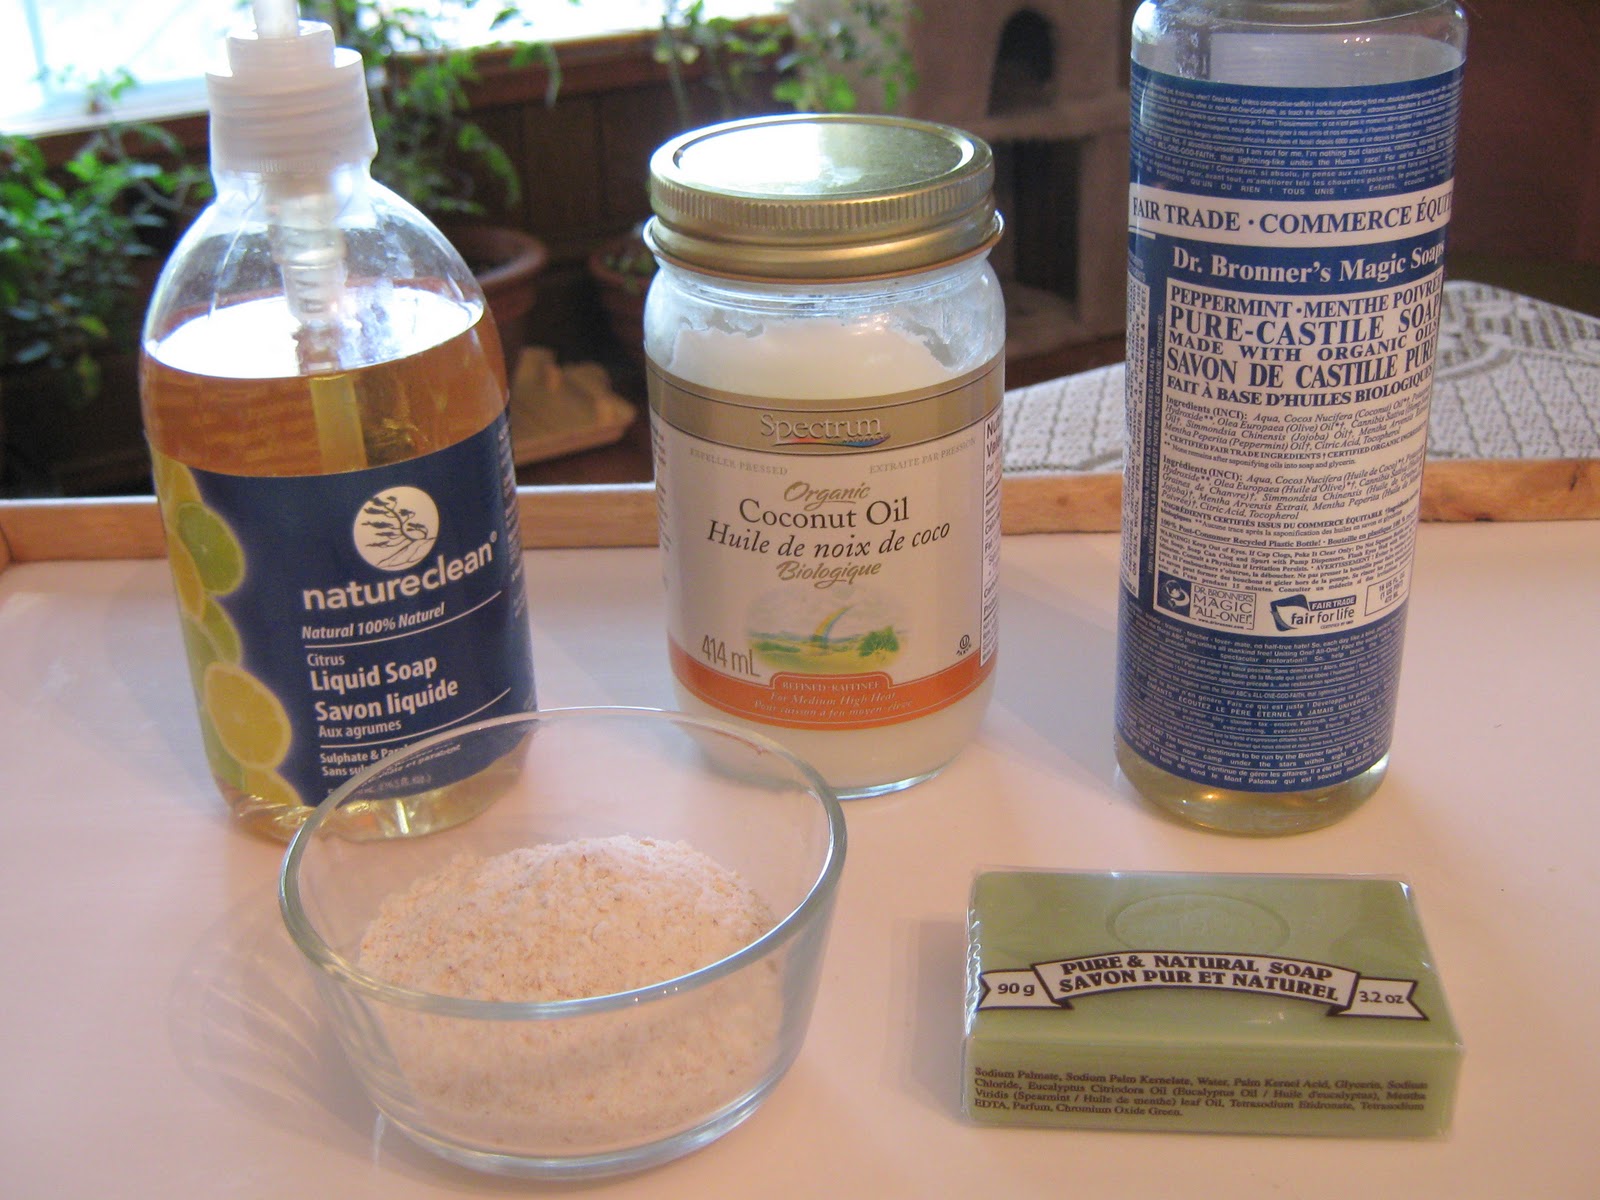
Liquid hand soap: Nature Clean Citrus Liquid Soap. I totally love this stuff! Not only does it have a great clean citrusy scent, it meets every single one of my criteria, making it about as perfect as a product can get. It's also supposed to be available in a 3 litre refill jug, which would help reduce the cost and packaging, but so far I've yet to track it down anywhere I shop.

Bar Soap: Guelph Soap Company Eucalyptus and Mint Bar Soap. This soap is made less than an hour away from me and it's a great bargain for a natural soap! I've seen many natural bar soaps priced from $5-7 a bar, which is just not realistic for my family's budget. I purchased this soap for $1.59 a bar (you have to buy a pack of six to get it at this price, but it's worth it!). My husband and I both use it for shaving. It has a rich, creamy lather and doesn't dry out my skin. It's also a nice solid bar which doesn't melt away to nothing like a lot of other soaps do.

Body wash: I've been using Nature Clean Body Wash which I received as a gift. It's a pretty good product as far as meeting my criteria, but I've been underwhelmed by the scent. I'm planning to switch to Dr. Bronner's Organic Citrus Liquid Soap when I run out of my current body wash. As an added bonus, it's an extremely versatile product; I've been using their peppermint liquid soap in my homemade cleaning products as well as for handwashing and pretreating laundry.

Facial cleanser: I make my own "cleansing grains" (pictured in the glass dish above) using my adaptation of Crunchy Betty's winter face scrub. I make it with just the rice flour, oats and coconut with whatever essential oils I feel like adding (my current favourite is grapefruit) and I'll add calendula and/or chamomile if I happen to have some around. I've been using this for about a year now, and my skin has been wonderfully soft ever since (I gave it to my sisters-in-law for Christmas last year, and they all raved about it!)

Moisturizer: I use coconut oil on my face and body. People with less mature skin than I might find it a bit heavy, in which case grapeseed oil might be a better option. I've been looking in vain for a good affordable heavy-duty hand moisturizer for the winter months and I'm planning to try my hand at making some hard lotion any time now (I'll report back on how it goes!)

Deodorant: My husband and I have been using this homemade deodorant for about a year and a half now and we both love it. I like to add some essential oils to give it a pleasing scent - equal parts lavender and grapefruit for me, tea tree and peppermint for hubby. Our two boys have started using it too, now that they're old enough to need it!

My two remaining holdouts are toothpaste and shampoo/conditioner. I have really sensitive teeth and haven't found anything that works as good as the toothpaste I've been using since I was a kid. And I have a hard time finding hair care products that work well for my thick, curly, frizz-prone hair (I've tried the no 'poo thing with little success). I have my eye on the Yes to Carrots line as a possibility when I've used up my current shampoo stash.

Do you have some favourite personal care products or recipes to recommend? Please share in the comments!

Tuesday, April 26, 2011

Six Natural & Cheap Ways to Freshen Up Your Home


Since it's officially "spring cleaning season", my local store flyers have been filled with ads for all manner of home freshening products for the last several weeks. Not only are these products expensive, they're filled with some pretty nasty chemicals that I have no interest in bringing into my home. Plus, I'm really sensitive to artificial scents - even some "green" cleaning products have given me severe headaches! So, I much prefer homemade, inexpensive and natural options when it comes to keeping my home smelling fresh. Here are my favourites:

1. Break out the baking soda: What would I do without baking soda? I use it nearly every day for some household application or another. Obviously, it's great for reducing odors in the fridge, but you can use it in other areas of your home, too. Sprinkle a bit in the bottom of garbage cans to keep them from getting stinky. To freshen up carpets, sprinkle them with baking soda mixed with a few drops of essential oil (lemon is particularly nice for a fresh scent, lavender is soothing in bedrooms). Leave on for 10-15 minutes, then vacuum it up.

2. Make an essential oil spray: Mix water in a spray bottle with 20-30 drops of essential oil and lightly mist the area that needs freshening (don't go so heavy that you're starting to soak curtains, bedding, etc!)

3. Create a concentrated deodorizer by putting several drops of essential oil on a cotton swab. Place this in a musty smelling closet or cupboard, and it will work wonders at freshening it up.

4. Simmer citrus peels on your stove: Cut up lemon, orange or lime peels and simmer then gently on the stove (make sure not to let it boil dry!)

5. Make lemon & rock salt deodorizers: I learned this trick from Crunchy Betty. Cut a lemon in half, then scoop out the flesh (I usually wait til I'm going to juice one anyway, so I don't waste the flesh). Fill the empty lemon "shell" with rock salt, and place in an area that needs freshening (behind the toilet or beside the cat's litter box, for example). These deodorizers will remain effective for about two months or so before you need to make new ones.

6.. Bring in the mint: As I mentioned last summer in my post about the many uses for fresh mint, it makes a wonderful air freshener! Fill mason jars or vases with a bunch of mint sprigs, add a bit of water in the bottom, and place in strategic areas around your home. I have one on the back of my toilet tank, and it does a great job of keeping my bathroom smelling fresh (I need to replace the mint about once a week or so).

What about you? Do you have any tried-and-true natural ways of keeping your home smelling fresh that I haven't mentioned? If so, I'd love for you to leave a comment and share them with us!

Friday, April 1, 2011

Energy Medicine: Frugal & "Green" Self Health Care


I've been intending to write about this topic for a while as it's one that is near and dear to my heart. I know for some people it will be a little "out there", but that's okay. These are techniques that for me have been life-changing, and I'm so grateful to have found them.

I love energy medicine for a lot of reasons; many of these techniques are quite simple to learn and use, they're non-invasive, gentle and effective, they're non-polluting (you're working directly with your body's own energy systems, there are no external inputs required) and, since all you need to do them is your hands, you have access to them 24-7, no matter what you forgot to pack in your purse!

A few disclaimers before I go on: this is a really huge topic and I'm just scratching the surface in this post. I'm going to recommend some of my favourite resources so you can explore these techniques in much greater depth if you're interested. I'm not a licensed health care professional, just a mom who is passionate about natural healing techniques. Obviously, you need to use common sense with these methods, just as you would with any others - always seek the advice of a qualified health professional when needed.

Now that I've got that out of the way, on to the interesting part...

"Energy medicine" encompasses a variety of techniques that work directly with the body's energy systems, such as meridians and chakras. If you've ever had acupuncture, that's an example of a treatment that is based on working with the meridian system. While acupuncture requires needles, there are many other energy methods that require only the use of your hands working directly on the surface of the body.

1. Acupressure: Michael Reed Gach, the author of Acupressure's Potent Points, describes acupressure as "an ancient healing art that uses the fingers to press key points on the surface of the skin to stimulate the body's natural self-curative abilities". Think acupuncture without the needles. I have used acupressure with great results for a number of different issues. Last summer, my son was having a lot of trouble with swimmer's ear. It started out as a minor aggravation, but got to the point that one afternoon he was nearly in tears about it (and he's a tough kid, so if he's complaining, it's really bothering him). I decided to try the acupressure treatment for earache to see if that would bring him any relief. I was pretty shocked when, about 3/4 of the way through the recommended sequence, he looked at me with a startled expression and told me the pain was completely gone, and that he'd felt a release of the fluid pressure in his ears. I expected we'd have to do this treatment regularly, but in fact he never complained of the problem again for the rest of the summer! That was probably the most dramatic experience I've had with acupressure, but I've had good results using it for nosebleeds, headaches, nausea/motion sickness, heartburn, and pain and swelling from a foot injury. The techniques are very simple, so if you have a kid who is prone to nosebleeds or motion sickness, you can teach them the specific points to use and they can easily do it on their own to help themselves. Gach's book is a fantastic resource (I snagged a copy for under a buck at a church rummage sale!). There is also a lot of information to be found at acupressure.com, and you can sign up for a free monthly newsletter there as well.

2. EFT (Emotional Freedom Techniques): Similar to acupressure, EFT works with the body's meridian system (it's sometimes referred to as "meridian tapping"). This simple technique involves tapping on a specific sequence of meridian points on the hands, face and upper body while saying specific phrases related to the issue at hand. It can be used to help with a wide variety of issues, both physical and emotional. Once again, the basic method is easy enough that a child can easily be taught how to use it on their own. If you have a kid who's prone to anxiety or has been through some type of traumatic event, I can't recommend this technique highly enough! (Of course, it's just as effective for adults). You can find a mountain of free information about this method at eftuniverse.com; go directly here to sign up for their free newsletter and/or download the free manual outlining the basics of this technique. You can also purchase a more detailed EFT Manual by Gary Craig on Amazon, or check out the DVD Try it On Everything, a documentary describing the experiences of several people using this technique to address serious issues like chronic pain and PTSD.

3. Advanced Energy Medicine Techniques: Acupressure and EFT are two wonderful, accessible ways to get started using energy medicine techniques, however, there is much more to energy medicine than just these two methods. If you are interested in exploring this topic in more depth, I would suggest checking out Donna Eden's book, Energy Medicine. It is NOT by any means a light read; this is a book packed full of much detailed information about the body's energy systems and a wide variety of energy medicine techniques. She also has another book specifically on women's health issues, Energy Medicine for Women. My library has both of these books, so you might want to check and see if yours does, too.You can go here to watch Donna demonstrate her Daily 5 Minute Energy Routine, which is a quick daily "tune up" for the body's energy systems.

The books recommended above:
 
Acupressure's Potent Points: A Guide to Self-Care for Common AilmentsThe EFT Manual (Everyday Eft: Emotional Freedom Techniques)Energy Medicine: Balancing Your Body's Energies for Optimal Health, Joy, and VitalityUpdated and ExpandedEnergy Medicine for Women: Aligning Your Body's Energies to Boost Your Health and Vitality

(Disclaimer: all the links to resources are Amazon affiliate links; if you purchase anything from Amazon after clicking through, I will receive a commission that's a small percentage of your total purchase. As usual, I always recommend you check out the resources at your local library first!)

If you decide to give any of these methods a try, I'd love to hear about your experiences with them.

Saturday, February 19, 2011

Beat the End-of-Winter Blahs with a Do-It-Yourself Spa Night


Yesterday was one of those gorgeous days when nature gives you a 24-hour reprieve from winter: Ten degrees Celsius, with lots of bright, warm sunshine. It was heavenly. Today, we're back to sub-zero temperatures, overcast skies, and howling wind. That little taste of spring has me longing for more, and knowing that more than likely we'll still see a good share of snow/freezing rain/other random nasty precipitation before spring arrives for good.

If now isn't the perfect time for a little body-focused indulgence, I don't know when is! After all, that cold, dry air is really hard on our poor skin. And not only does a spa night rejuvenate you on the outside, it gives you a great mental boost, too. Best of all, it doesn't have to make a big dent in your pocketbook (after all, we have those winter heating bills to contend with, too!) For less than the price of a coffee at Starbucks, you can treat  yourself to an evening of head-to-toe pampering.

Step One: Tame those fingernails
Take a few minutes to file your nails into shape, then (if you have a nail buffer handy), buff them to a shine. Then soak your fingers for a few minutes in a bowl of warm water with 1 tbsp olive oil added to it.

Step Two: The Frugalista Facial

First, clean your face. My favorite cleansing method right now is my tightwad version of Crunchy Betty's Winter Face Scrub (I make mine with just the rice flour, oats, and coconut, with calendula and chamomile thrown in if I have some around).

Once your face is clean, it's time for a steam: Fill a heat-proof bowl with boiling water. If you have a chamomile tea bag handy, throw it in. Add a few drops of essential oil, too, if you want (lavender is my favorite for relaxing). Hold your face over the bowl for a few minutes, with a towel held over your head to form a "tent" to hold in the steam.

The final part of the frugal facial is a moisturising mask: Slather some honey over your face and leave on for 15-20 minutes, then rinse off. I like to leave the mask on while I move on to step three!

Step 3: The Skin-Softening Soak
Run a nice hot bath, adding equal parts dry milk powder and baking soda (I use about 1/3 - 1/2 cup of each). Once again, you can add some essential oil if you like. Make sure you have a good book close at hand, as well as a cup of tea (I prefer a mint-green tea blend for this occasion). Climb on in and stay there for as long as you can get away with.


Step 4: Tenderize those Tootsies!
It's time to pay your hard-working feet some attention. Trim your nails if needed. Now treat them to an exfoliating scrub. Combine 2 tbsp salt, 2 tbsp ground oats, 2 tbsp ground coconut and 1 tbsp baking soda (I reserve a coffee grinder for doing the fine grinding). Add just enough water until it forms a paste, then rub vigorously all over your feet for a couple of minutes. Rinse off, then apply a heavy moisturizer (I like olive or coconut oil). For an extra treat, you can give yourself a short foot massage while you're at it, too. Once you're finished, put on a pair of socks so you don't slide all over the floor.

Step 5: Full-Body Moisturizing
Moisturize the rest of your body (you can use olive or coconut oil here, too) and don't forget to rub some into your nails and cuticles! Now put on your comfiest pajamas and chill out for the rest of the evening with a good book or movie.

Got some frugal body-pampering secrets to share? I'd love to hear them, so please leave a comment and tell me all about them.

Friday, December 31, 2010

My Top Five Frugal Successes of 2010


It's the last day of 2010 and I've been taking some time to reflect on the year's many joys and challenges. A lot of things have happened in our family this year (many of them too personal to share on this blog). What I *can* share are some of the frugal changes we made over the course of the year that have been the most satisfying to me.

1. Finally ditching cable...for good.
This one seems like a total no-brainer; after all it's practically Frugality 101. We canceled our cable service in January. For a family that previously lived without a TV for a couple of years, I don't know how we ever managed to get sucked into cable, but we did. We had it for about seven years, and in hindsight it's definitely one of those "what were we thinking?" situations. Neither my husband or I are big TV watchers in the first place. We discovered after we canceled our cable service that a simple pair of rabbit ears given to us by a neighbour allows us to receive the 3 or 4 channels we most commonly watch. Since we're in Canada, we don't have access to Hulu; however the netflix streaming service is now available in Canada and if we wanted to spend $7.99 a month we could stream it through my boys' Playstation 3 system. Right now we've been very content to watch shows on DVD from the library (we're fortunate that our library has an extensive DVD collection). The only thing I've really missed is being able to watch baseball games during the summer (we listened to them on the radio instead).

We had our phone, internet, and cable services bundled through a single provider, so when we canceled cable, we reassessed our phone service and switched to a less expensive package (this was a new package that wasn't available when we first signed on with our current provider). These changes allowed us to cut our bill in half, from $162 and change a month down to just over $82. That means we saved $960 over the course of the year. I'm so pleased we made this change, but really wish we'd done it a lot sooner (or better yet, never succumbed to the lure of cable in the first place).


2. Switching to a cash system for groceries and miscellaneous spending.
I've always paid fairly close attention to how much we spend and allocated specific amounts for each item in our budget. Most of our bills are paid by automatic withdrawal, so they're pretty easy to keep track of. The two categories in our budget that were the most difficult to keep a handle on were groceries and miscellaneous spending (which for us includes everything from personal care to general household needs, gifts and haircuts). We finally decided to switch to a cash system for these two categories, and it's worked out beautifully. It's so much easier to track how much we've spent and how much we have left for the rest of the month. I simply put the designated amounts of money into envelopes at the beginning of each month, and once it's gone, it's gone (if there's any left at the end of the month, I roll it over into next month's envelope). This method has really helped us stay true to our designated budget without spending a lot of time trying to track our purchases.

3. Switching to reusable feminine hygiene products.
This is a change I had been meaning to make for a few years now. I tried the Keeper several years ago, and I really *wanted* to like it, but it just didn't work out for me (it was uncomfortable to wear and I had some kind of reaction to it). I planned to sew some cloth pads and never quite got around to it (my bottomless mending pile has a lot to do with that). I definitely didn't want to spend the amount of money required to purchase pre-made cloth pads, but I'd had enough of purchasing disposable products (not to mention all the unnecessary waste they create). I finally came up with a very simple, no-sew solution that took me all of five minutes. It's worked well for me for several months now. I'll share more details in a future post.

4. Learning how to make my own homemade deodorant.
Not only is this a money-saver, it's very satisfying to find an all-natural solution that actually works! My husband and I have been using this recipe since the spring and we both love it. I add a few drops each of tea tree and peppermint essential oil for extra anti-microbial coverage and a fresh, clean scent. This discovery has blossomed into an interest in making more of my own personal care products, and a few weeks ago I discovered the awesome blog CrunchyBetty.com. Since then I have enjoyed making Mocha-Frappuccino face masks and Winter Face Scrub and am itching to experiment with many more concoctions in the new year.

5. Perfecting my homemade yogurt and granola recipes.
I definitely know my way around the kitchen and generally have no trouble creating a wide variety of tasty foodstuffs from scratch. The perfect yogurt and granola recipes seemed to have eluded me for years, though. This year I finally got them both right! I can now consistently turn out a vanilla yogurt that my family loves, and have achieved what I consider to be "granola perfection" - flavourful, crunchy, but not too sweet (recipe here).


What were your biggest frugal successes in 2010?

Friday, November 19, 2010

Seven Natural (and Cheap!) Ways to Calm a Cold


I've been planning on writing this post for a while, since we're headed into the heart of cold and flu season. Now that I've actually succumbed to a cold myself (after a crazy-busy week last week that pushed me a little further than I wanted to go) it seems appropriate that I get around to sharing my favourite low-cost ways to ease discomfort and promote healing when you've got a bad case of the sniffles.

1. Steam inhalation
A steam inhalation helps to loosen congestion. To prepare one, *carefully* pour boiling water into a heat-proof glass or ceramic bowl. Add 3-5 drops of peppermint or eucalyptus essential oil (or use a combination of both). Place a towel over your head to form a tent and lean over the bowl (be careful not to get too close or you could scald yourself) Remain under the tent for 5-10 minutes, breathing as deeply as possible.


2. Peppermint tea
Not only is mint tea my favourite herbal tea, it's purported to be one of the best herbs for treating a cold. Not only that, if you grow your own, it's also a totally free remedy! Using fresh mint is ideal (mine is still happily growing away in my garden even after repeated frosts); dried will do if that's all you have available. To make fresh mint tea, place several good sized sprigs of mint in your teapot and add boiling water to fill it. Let steep about 10 minutes before pouring.


3. Honey and Thyme Cough Syrup
This homemade cough syrup is simple to prepare and I've found it to be very effective. Pour 1/2 cup of boiling water over 1 tbsp dried thyme. Cover and steep for 20 minutes. Strain into a small saucepan and add 1/4 cup honey. Heat gently until the honey dissolves completely. Cool. Store in a glass jar in the fridge. Take 1 tbsp as often as needed. (Note: honey should NOT be given to children under age one due to the risk of infant botulism).

4. The "Cold Sock Treatment"
A friend turned me onto this a while ago. I know it sounds totally weird, but I have to say that it worked amazingly well for me one night when I was brutally congested and decided to give it a shot.! I had an incredibly restful sleep and was about 95% less congested in the morning. Also, it wasn't nearly as unpleasant as I expected it to be (the thought of putting on cold, wet socks when I felt like crap was not especially appealing). All you need is a pair of cotton socks and a pair of wool socks. The complete instructions can be found here, and you can read more about the theory behind it here. It's recommended that you do this treatment three nights in a row for maximum effectiveness.

5. The Thymus Thump
This is an energy medicine technique that stimulates the immune system. It's very simple and can be repeated multiple times per day.


6. Acupressure
Acupressure can be used both to relieve cold symptoms and to help stimulate the immune system. You can find instructions for acupressure techniques for cold and flu symptoms here.

7. Sleep!
Sleep is the most obvious, and often the most overlooked natural remedy for illnesses. When you get sick, your body's trying to tell you something - it's time to rest! Do everything you can to get as much sleep as possible (that means napping during the day plus a good sleep at night). If you have young children, find someone to watch them for you for an hour or two while you rest. You'll likely get over your cold much faster.

Do you have a favourite, thrifty cold treatment that I haven't mentioned? Please share it with us in the comments!
Related Posts with Thumbnails