Sunday, January 30, 2011

Weekly Menu Retrospective #23


Welcome to my weekly roundup of the past week's eats. I prefer to report what we ate in the last week, rather than what we're planning to eat in the coming week. Why? The reason is pretty simple: although I usually have a general idea of what we're going to eat in the next week or so, life often unfolds a little differently than planned, and I adjust my menu plan on a near-daily basis to accommodate leftovers and other not-possible-to-plan-ahead circumstances. I find this is the easiest way to ensure that I minimize our family's food waste. I'm also willing to admit that I'm a rather spontaneous cook, given to preparing foods that strike me as the most appealing thing to eat right here and now!

Breakfasts: homemade granola with yogurt or milk, orange pineapple muffins, blueberry pancakes

Lunches: pizza, leftovers, omelets

Dinners:

Monday: Falafel Burgers, Colourful Cabbage Salad, Oven Fries

Tuesday: Baked Pasta, peas

Wednesday: Leftover Buffet

Thursday: Cheesy Corn Chowder, leftover cabbage salad, butterscotch pudding

Friday: Sausage & Onion Calzone, sliced raw veggies 

Saturday: Pizza

Sunday: Fish Au Gratin, honey & orange roasted root vegetables, sour cream chocolate chip cake

Snacks & Sides: apples, clementines, bananas, fresh pineapple (on sale for $1 each this week!!), homemade yogurt, popcorn

For more great meal ideas, check out Menu Plan Monday at orgjunkie.com.

Thursday, January 27, 2011

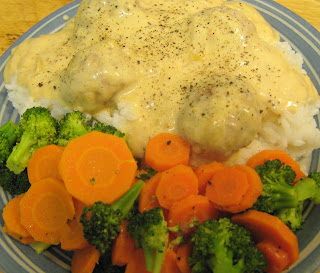
RECIPE: Smothered Meatballs


This is one of those dishes that my kids are always happy to see on the table! We love these meatballs served over mashed potatoes, but you could also serve them over rice or pasta.

Even better, if I have a stash of meatballs in the freezer, it takes very little work to throw these together. If you love meatballs as much as we do, when you buy a club-size pack of ground beef, whip up a double or triple batch of meatballs and freeze them (cooked or uncooked) so you can throw together a meal like this one with just a few minutes of hands-on work. If you're going to freeze them uncooked, I recommend putting them on a cookie sheet to freeze (like you would do for berries) then pack them into meal-sized portions. That way the raw meat won't all stick together and form one giant meatball!

Ingredients:

Meatballs:
¾ lb ground beef
¼ cup parmesan cheese
½ cup bread crumbs
1 egg
1 ½ tsp Worcestershire sauce
½ tsp each salt and pepper
1 tbsp canola or vegetable oil

Sauce:
2 tbsp butter
1 large onion, chopped
2 cloves garlic, diced
2 tbsp flour
1 ½ cups milk
½ tsp salt
½ tsp pepper
½ tsp paprika

Instructions:
In a medium bowl, combine all meatball ingredients except oil and mix until well blended. Shape into 16 meatballs. In a medium frying pan, cook meatballs in oil over medium heat until completely cooked through. Remove meatballs from frying pan.

In the same pan, saute onions and garlic in butter until onions begin to soften. Add the flour and stir until it's completely coated with butter. Add milk, salt, pepper and paprika. Stir constantly over medium heat until sauce begins to thicken. 

Return meatballs to pan and simmer until sauce is thick and bubbly and meatballs are heated through.

Serves 4. 

What is your favourite way to serve meatballs? 

I shared this recipe at Tasty Tuesday, Full Plate ThursdayFrugal Food Thursday, Recipe Swap Thursday, Tip Day Thursday, Friday Favorites, Fat Camp Friday and the GCC Recipe Swap.

Tuesday, January 25, 2011

How To Make Your Own Menstrual Pads in Five Minutes

Okay, okay, some of you are going "eeeeeeew" right about now. I've been meaning to write a post about this for a while, but I've been dragging my heels about it because I know for some people this topic has a high ick factor.Before you decide to skip past this post and on to your next favourite blog, let me say that I wish I'd been smart enough to do this years ago as I've been very pleased with the results.

At the end of December, I wrote that making my own menstrual pads was one of my top frugal successes of last year. It's something I'd been meaning to get around to for years. Both the expense and the amount of waste created by disposable products really got under my skin. I'd tried The Keeper several years ago, and unfortunately it just didn't work out for me (although I know many others for whom it works great). So, ever since then I'd been planning to make my own pads...and never quite getting around to it. I'm a reluctant sewer at best, and my never-ending mending pile is about all I manage to accomplish with a needle and thread most of the time.

Yes, you can buy pre-made reusable cloth pads, but holy cow, are they expensive! Being the tightwad that I am, there's just no way I was forking over that much dough for something I knew I could make myself! So, finally, a few months ago, when "that time of the month" caught me by surprise and I realized I was out of disposable products, the light bulb went on. I came up with a super quick and easy solution that, after five minutes' work, left me with several comfortable, absorbent homemade pads.

Here's how I did it:

Materials:
old polar fleece top or blanket (fabric should still be soft and not "pilled")
a few old washcloths or a couple of old cotton T-shirts (the thicker the cotton, the better)

Fleece and T-shirt material are ideal for this project, as they won't fray around the edges after cutting, even without hemming or zig zag stitching the edges. The terry cloth will fray slightly, but not enough for me to bother doing anything about it (I've been using my pads made with terry cloth for several months now and the fraying has been minimal).

Instructions:

If using washclothes, cut them into quarters like so:

If you're using an old T-shirt, cut out pieces roughly the same size as 1/4 of a washcloth. These are going to be the liner pieces for your pads.

Now cut out pieces of fleece slightly larger than the washcloth/T-shirt pieces:


Fold the liner pieces into thirds:


Then wrap the outer fleece portion around them:

Voila! Your very own homemade pads, ready in five minutes and it didn't even cost you a thing.

I store them folded up like this so they're ready to grab and go. To use one, place the folded-up liner piece on the crotch of your panties, then wrap the fleece piece over it with the ends on the underside of the crotch. Pin in place with small safety pins (one at the top and one at the bottom work fine for me). I hope those are sufficient directions as I'm not posting a photo of my underwear on the internet - a girl's gotta draw the line somewhere :)

I've found these to be surprisingly comfortable to wear (much more so than disposable products). They are adequately absorbent for my needs (if you have a really heavy flow, you might want to use 2 liner pieces rather than one). I don't find them overly bulky, and I can't feel the safety pins at all when I'm wearing them (even when riding my bike). The only drawback to these is they're a bit fiddly (but certainly not impossible) to change while you're actually wearing your underwear (if I'm at home I take my undies completely off to pin a fresh one in place).

These pads have been very easy to wash, too. I find the polar fleece naturally stain resistant and after several months of use they are not stained at all. It's important to rinse/soak the pads in cold water only, as warm or hot water will set blood stains. I rinse them briefly when changing them, then soak them in cold water with a bit of Dr. Bronner's or homemade laundry detergent tossed in (an old ice cream tub with a lid stashed in a discreet corner of your bathroom is perfect for this). On laundry day, I simply give them a final rinse then toss them in the wash.

Overall, I've been extremely pleased with these and so glad I came up with this simple solution! I would love to hear other people's experiences with reusable/homemade menstrual products if you care to share them here.

Sunday, January 23, 2011

Weekly Menu Retrospective #22

 Welcome to my weekly roundup of the past week's eats. I prefer to report what we ate in the last week, rather than what we're planning to eat in the coming week. Why? The reason is pretty simple: although I usually have a general idea of what we're going to eat in the next week or so, life often unfolds a little differently than planned, and I adjust my menu plan on a near-daily basis to accommodate leftovers and other not-possible-to-plan-ahead circumstances. I find this is the easiest way to ensure that I minimize our family's food waste. I'm also willing to admit that I'm a rather spontaneous cook, given to preparing foods that strike me as the most appealing thing to eat right here and now!

Breakfasts: banana chocolate chip muffins, granola, carrot raisin bran muffins, waffles

Lunches: pizza, leftovers, peanut butter toast

Dinners:

Monday: Lentil soup and Garlic and Cheddar Biscuits

Tuesday: African-Style Vegetable Stew, whole wheat bread

Wednesday: Italian Meatball Subs

Thursday: Spinach & Bacon Egg Puff

Friday: Hot dogs and Parmesan & Herb Pasta 

Saturday: leftover buffet

Sunday: Beef & Barley Stew, Chocolate Mousse

Snacks & Sides: apples, bananas, clementines, fresh pineapple, banana bread, yogurt

Wednesday, January 19, 2011

RECIPE: African-Style Vegetable Stew


Since I had so many positive responses to my Spicy Black Bean Bake, I thought I'd share another recipe for a quick and easy vegetarian entree. This simple stew is more filling than you might suspect. It's perfect served with fresh homemade bread, biscuits, or cornbread on the side. More vegetables can easily be added based on what you've got hanging around in the fridge and freezer.

Ingredients:
1 tbsp canola or vegetable oil
1 medium onion, chopped
2 cloves garlic, minced
2 cups shredded cabbage
1 small or 1/2 large sweet potato, peeled and cut into 1/2" chunks
1 cup crushed tomatoes
2 cups water
1/2 cup peanut butter
1 tsp cumin
1/8 tsp cayenne pepper
1/2 tsp salt
1/2 tsp pepper

Instructions:
In a large saucepan, saute the onion and garlic in oil until onion begins to soften. Add the cabbage and sweet potatoes and cook over medium heat for a few minutes until cabbage softens. Add tomatoes, water, peanut butter, cumin, cayenne, salt and pepper. Simmer over medium heat, stirring occasionally, for about 20 minutes or until sweet potatoes are tender. Serves 4.

Love the peanut-and-tomato combination? Try these other recipes:
West African Style Baked Beans
Spicy Peanut and Tomato Soup

Need to use up the rest of that cabbage?
Colourful Cabbage Salad

I shared this recipe at Just Another Meatless Monday, My Meatless Mondays, Midnight Maniac Meatless Mondays, Mouthwatering Monday, Tasty Tuesday, Full Plate ThursdayFrugal Food Thursday, Recipe Swap Thursday, the GCC Recipe Swap, Friday Favorites, Fat Camp Friday and Seasonal Sunday.

Monday, January 17, 2011

Weekly Menu Retrospective #21


Welcome to my weekly roundup of the past week's eats. I prefer to report what we ate in the last week, rather than what we're planning to eat in the coming week. Why? The reason is pretty simple: although I usually have a general idea of what we're going to eat in the next week or so, life often unfolds a little differently than planned, and I adjust my menu plan on a near-daily basis to accommodate leftovers and other not-possible-to-plan-ahead circumstances. I find this is the easiest way to ensure that I minimize our family's food waste. I'm also willing to admit that I'm a rather spontaneous cook, given to preparing foods that strike me as the most appealing thing to eat right here and now! 

This week is another one where I've cooked a lot of recipes not yet on the blog, so again, not so many links. The good news is I don't think I'll run out of recipes to share any time soon.

Breakfasts: baked oatmeal, cornbread with jam, banana chocolate chip muffins, pancakes

Lunches: peanut butter toast, Toad-in-the-Hole, pizza, leftovers

Dinners: 

Monday: Taco Stuffed Pasta Shells, creamy cucumber salad

Tuesday: Speedy Black Bean Soup, cornbread

Wednesday: Fried Rice (using up leftovers)

Thursday: Crispy Parmesan Chicken, mashed potatoes, milk gravy, broccoli and carrots

Friday: leftover taco stuffed shells 

Saturday: Cheesy Mac & Beef Skillet

Sunday: Sweet & Sour Pork, Peanut Butter Oatmeal Cake

Snacks & Sides: apples, clementines, bananas, carrot sticks, popcorn, peanuts

For more great meal ideas, visit Menu Plan Monday at orgjunkie.com.

Saturday, January 15, 2011

Why It's Worth It To Bake Your Own Bread


I've been a bread-baker for a long time; I've been cranking out homemade loaves for well over a decade now. We eat store-bought bread so infrequently that my kids protest whenever I pull out one of those purchased-on-sale-and-stashed-in-the-freezer emergency loaves for those times when I fall behind on my breadmaking schedule. They're so used to the freshly baked goodness of a homemade loaf that the store-bought stuff is vastly inferior in their eyes.
So, making your own bread is definitely worth it just from a quality perspective. Heck, it might even be worth it just because of the way it makes your house smell! That being said, there's no denying the financial advantages of home baked bread. I've always known that making my own bread saved a lot of money, however until recently I hadn't bothered to calculate the exact savings. 

Here's the cost breakdown for a batch of my Whole Wheat Refrigerator Dough (which makes 3 loaves of bread):

5 tsp yeast (purchased in bulk) = 28.8 cents
1/2 cup sugar = 11 cents
1 cup mashed potatoes = 12.6 cents
1/2 cup canola oil = 24 cents
1 egg = 17 cents
3 tbsp ground flax seed (purchased in bulk) = 5.5 cents
1 1/2 tsp salt = 1.4 cents
4 cups whole wheat flour (purchased in bulk) = 33.6 cents
3 1/2 cups white flour (purchased in bulk) = 30.8 cents

Total cost for a batch = $1.65, or 55 cents per loaf.

In comparison, a loaf of decent-quality bread costs $1.99 on sale, and it doesn’t go on sale for that price very often. Since our family of four generally goes through the equivalent of 6 loaves of bread per week (or 24 loaves a month), it’s difficult to stockpile enough in the freezer to get us through from one sale to the next (plus I’d rather dedicate that freezer space to other items). 

Monthly cost savings of making my own bread:
24 loaves of sale priced bread @ 1.99/loaf = $47.76
24 loaves of homemade bread @ 0.55/loaf = $13.20

$47.76 - $13.20 = $34.56
Now, if you have a very large grocery budget you might not find that a huge savings. On our modest grocery budget of $375 a month, a nearly $35 savings per month on a single food item is huge - that's nearly 10% of our total budget!

Making bread using my refrigerator dough method is easy and convenient, and for our family it is well worth the minimal effort involved. It's also an activity I enjoy doing, and it even makes a great gift.

Do you make your own bread? If not, have I convinced you to give it a shot?

Wednesday, January 12, 2011

RECIPE: Spicy Black Bean Bake


My older son *loves* black beans so I'm always looking for new ways to use them. I came up with this dish one night when I wanted something meatless, quick, and filling. Both my boys loved it, so it's definitely going in our regular menu rotation (I would have a photo, but the midnight snackers ate the leftovers I was saving to photograph during daylight!)

Ingredients:
1 tbsp olive oil
1 medium onion, chopped
2 cloves garlic, minced
1 ½ cups salsa
3 cups black beans
1 ½ tsp chili powder
1 tsp cumin
½ tsp each salt and pepper
juice of 1 lime
1 ½ cups grated cheddar cheese

cornbread batter for topping (recipe below)

Instructions:
In a large frying pan, sauté the onion and garlic in oil until tender. Add the salsa, black beans, chili powder, cumin, salt pepper and lime juice. Simmer over medium heat for a few minutes to allow flavours to blend.

While bean mixture is simmering, prepare the cornbread batter.

Pour the bean mixture into a greased 11x7" lasagna pan. 

Sprinkle with grated cheese, then pour cornbread batter over top and spread evenly.

Bake at 375°F for 25 minutes or until topping is golden brown and springs back when lightly touched.

Serves 6.

Cornbread Batter:
1 cup flour
1 cup cornmeal
⅓ cup sugar
2 eggs
1 tbsp baking powder
½ tsp salt
1 cup milk
¼ cup vegetable oil

In bowl, combine dry ingredients.  In small bowl, combine remaining ingredients and beat well. Stir into dry ingredients just until moistened. 

I shared this recipe at  Tasty Tuesday, Full Plate Thursday, Fat Camp Friday, the GCC Recipe Swap and Friday Favorites.

Monday, January 10, 2011

Winter Walk Challenge Update


Back at the beginning of December, I issued a "Winter Walk Challenge" and invited my readers to join me in the goal of walking outdoors at least 30 minutes per day. I have trouble staying motivated to get out of the house during the colder months and this was my plan to get some fresh air and exercise daily while avoiding cabin fever! I meant to issue an update right at the beginning of January, so I'm a bit late getting to it, but on the "better late than never" theory, here it is.

I'm afraid I have to report that I had very limited success during my first month of the Challenge. On Day 1, it was raining, but I went out anyway, so I was proud of myself for that. The very next day, minutes before I was to embark on my walk, my older son fell and got a very impressive gash on his forehead that required stitches, so instead of a walk I got a trip to the doctor's office. The day after that, I was busy trying to catch up on all the stuff I didn't get done while I was at the doctor's the day before! For about a week after that, I was very consistent and got in a daily walk. After that, things fell apart, and to be honest, from about December 10th on is a giant blur and I got in the occasional walk here or there, but I know I didn't come anywhere close to walking every day.

I'd like to be able to say that once the new year rolled around, I got right back on track, but (ahem) it didn't quite work out that way. I did venture out on a New Year's Day walk, however, since then it's been hit-or-miss again. Today's a nice bright sunny day (albeit, minus 13 Celsius!!) so I am going to renew my resolve, get all bundled up, and get out there. I want to see if I can stick with it every day for the rest of the month. If this frigid weather keeps up, at least I won't have to worry about getting stuck walking in the rain.

One thing I *did* manage to do consistently was attend Bikram Yoga classes weekly. I've been going faithfully every Friday since the last week of November (and even went twice the week between Christmas and New Year's). Since I ride my bike there and back as well (about 5 km in each direction), I get a LOT of exercise on Fridays. I purchased a 20 class package through Groupon, and although the class is very challenging, I love it! In fact, I used the money I received as Christmas gifts to purchase more classes, and I plan to start going twice a week.

How about you? If you joined me on the Challenge, how have you made out so far? And if you haven't yet joined in, it's not too late. Hop aboard and we'll root each other on for the rest of the winter.

Sunday, January 9, 2011

Weekly Menu Retrospective #20


Welcome to my weekly roundup of the past week's eats. I prefer to report what we ate in the last week, rather than what we're planning to eat in the coming week. Why? The reason is pretty simple: although I usually have a general idea of what we're going to eat in the next week or so, life often unfolds a little differently than planned, and I adjust my menu plan on a near-daily basis to accommodate leftovers and other not-possible-to-plan-ahead circumstances. I find this is the easiest way to ensure that I minimize our family's food waste. I'm also willing to admit that I'm a rather spontaneous cook, given to preparing foods that strike me as the most appealing thing to eat right here and now! 

Wow, I really have been cooking up a lot of new recipes lately - so many, in fact, that I have nothing to link to this week as none of them are up on the blog yet! I promise I will share them here, starting this Wednesday.  

Breakfasts: pancakes, Aloha Muffins, French toast

Lunches: leftovers, pizza, peanut butter toast

Dinners:

Monday: Turkey Salsa Casserole

Tuesday: Southwestern Beef & Pasta Soup 

Wednesday: Ham & Potato Hash

Thursday: Smothered Meatballs, mashed potatoes, carrots

Friday: Spicy Black Bean Bake

Saturday: Leftover pizza by myself (kids on a playdate and hubby working)

Sunday: Fish in Spicy Coconut Milk, rice, carrots, Pineapple Coconut Cake

Snacks & Sides: apples, bananas, clementines, fresh pineapple, carrot sticks, popcorn

For more great meal ideas, stop by Menu Plan Monday at orgjunkie.com.

Wednesday, January 5, 2011

RECIPE: Indian-Spiced Honey Garlic Chicken


I came up with this recipe when I had a stockpile of sale-priced chicken and wanted something a bit new and different. This is a mildly spicy twist on honey garlic chicken that is kid-friendly. Serve with plain, coconut, or curried rice and vegetables.

8 chicken thighs or drumsticks, bone in (skin on or off as you prefer)
2 tbsp butter, melted
2 cloves garlic, minced
¼ cup honey
¼ tsp cinnamon
1 tsp ginger
½ tsp cumin
¼ tsp turmeric

Place the chicken pieces in a glass baking dish. Combine remaining ingredients and pour over chicken, turning pieces over a couple of times to make sure they are well-coated. Cover dish with foil and bake at 375°F for 45 minutes or until chicken is tender and no trace of pink remains. Pour a generous spoonful of sauce over chicken when serving. Remaining sauce can be poured over rice or vegetables if desired.  Serves 4.

I shared this recipe at Fat Camp Friday.
Related Posts with Thumbnails